Have a question? Enter a search term. Or give us a call at 1-888-518-0818

There’s a mass email feature stored in Smart Service Cloud. Although we’re going to focus on email notifications for upcoming work orders, you could use this feature to create and send emails in bulk or individually, for just about anything including invoices or quotes.
To get started, you’ll need to create some email templates. Go to the Administration Center and select "Email Text Templates". Click on the "plus symbol" on the bottom-right to create a new one.

IIn the example below, I created a basic email template to remind customers of a scheduled service for tomorrow. The "description" field is the name of the template and won't be seen by your customers.

Smart Service Cloud also has the advanced option of using "Merge Fields". Merge Fields are text that is surrounded by {brackets}. They are placeholders that automatically populate information from specific records so you can send emails in bulk or individually without having to personalize each one. To learn how to use Merge Fields click here.

Also, we have added an AI Assistant (as seen at the bottom of the window) designed to help you write professional messages, access technical information quickly, and work more efficiently across your organization.

In the above example, we created an email template to remind customers about tomorrow's appointment. So let's send a bulk email to those customers using that template. Go to the Work Orders Center.
Click on the column header for "Work Order Date:. Then click on "Date Filters". Click on the arrows, select "Tomorrow" and then apply the filter. Select all of the work orders, and then find "Send Email" on the left and click on it. Click on "Show Options" and find the desired template. Review, and make changes to the email if you would like before sending.

Again, you can send emails from just about anywhere, for anything within Smart Service Cloud. In the example below, we will email an individual a quote using a template.
Find the desired quote and click on "Send" at the bottom of your screen. You will be presented with the default email template for quotes. (More on that below). You can use a different email template if you choose, or create a new one by clicking on the plus symbol on the bottom-right of the window. You can edit the body of the message. Also, you will have options to include other elements such as attachments in the email.

As mentioned above, you will be presented with the default email template. You can set these defaults for quotes, work orders, invoices and others by going to the Administration Center and selecting Companies. Then select the chosen company. Click on "Edit" at the bottom of your screen.


Click on "Edit" at the bottom of your screen. Open up any of the applicable configurations. Click on the arrow in the Email/Text Template field, then select your desired default.
Also, you can create a new one by clicking on the plus symbol on the bottom right of the window.
Smart Service Cloud can automatically send email/text notifications to your customers — including reminders for upcoming work orders and quotes, as well as follow-ups on overdue invoices. Notifications are built from customizable templates and are sent on a schedule you control. All notification activity is logged so you can review what was sent and when.

To access Automated Email/Text Notifications, go to the Administration Center. In the menu, you will see two options related to this feature.
Notifications is where you create and configure your notification templates. This is where you define what the email says, when it sends, and who receives it.
Notification Logs is a history screen that shows all notifications that have been sent, are queued for delivery, or are waiting to be reviewed and approved before sending.
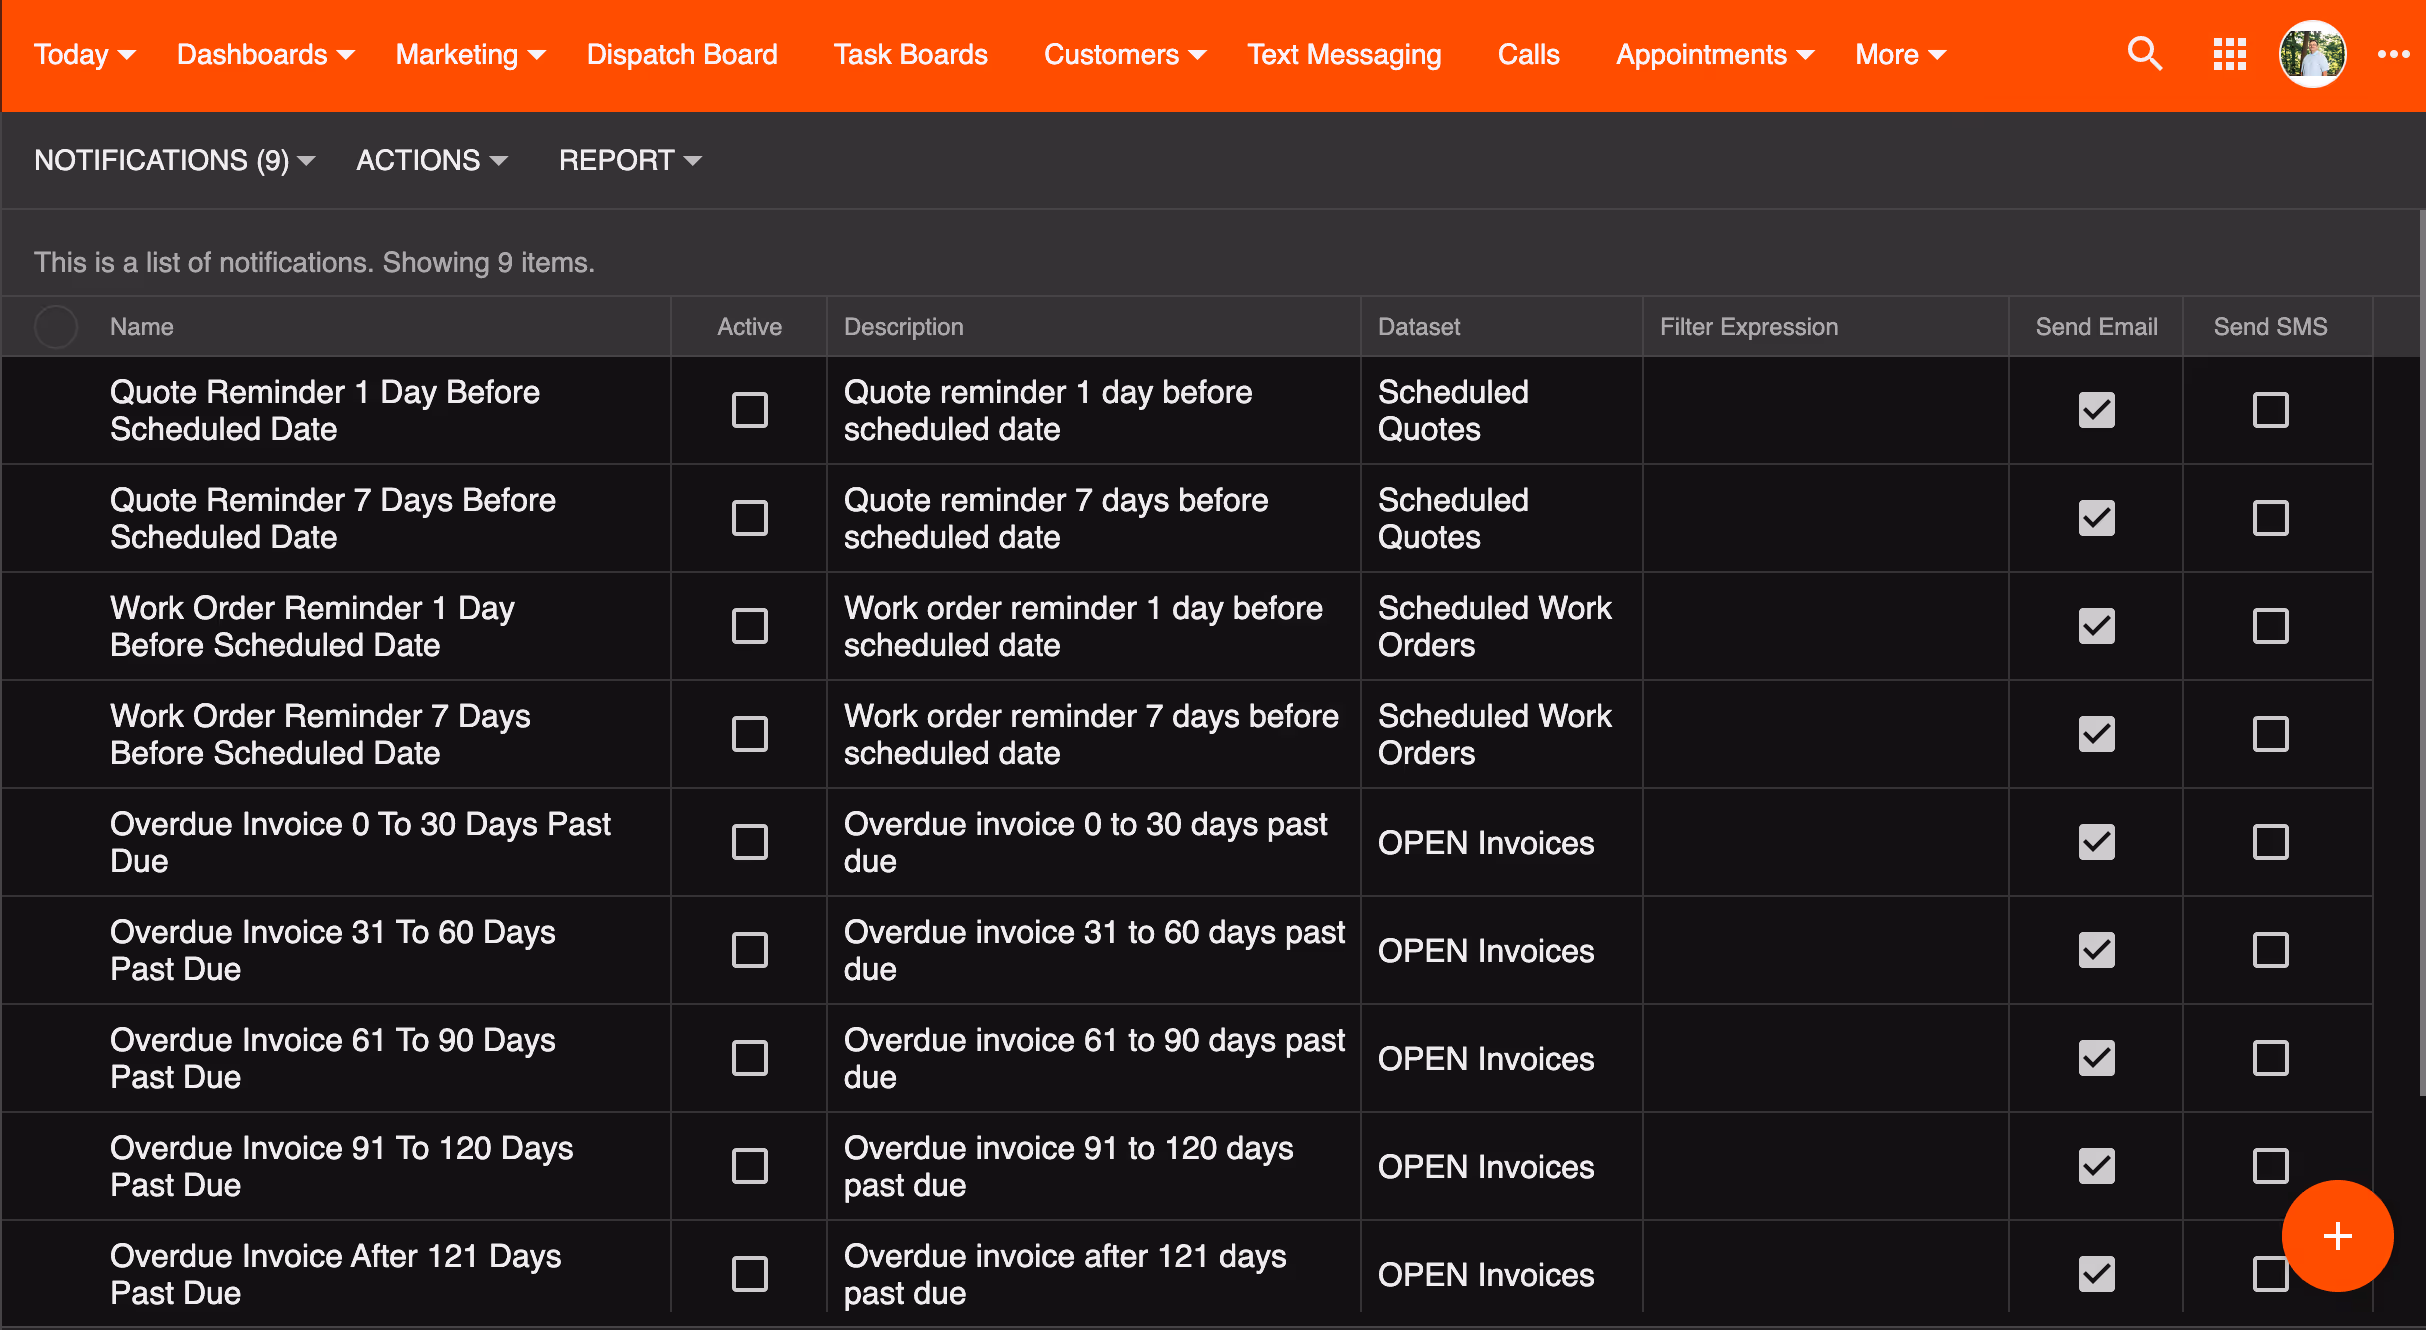
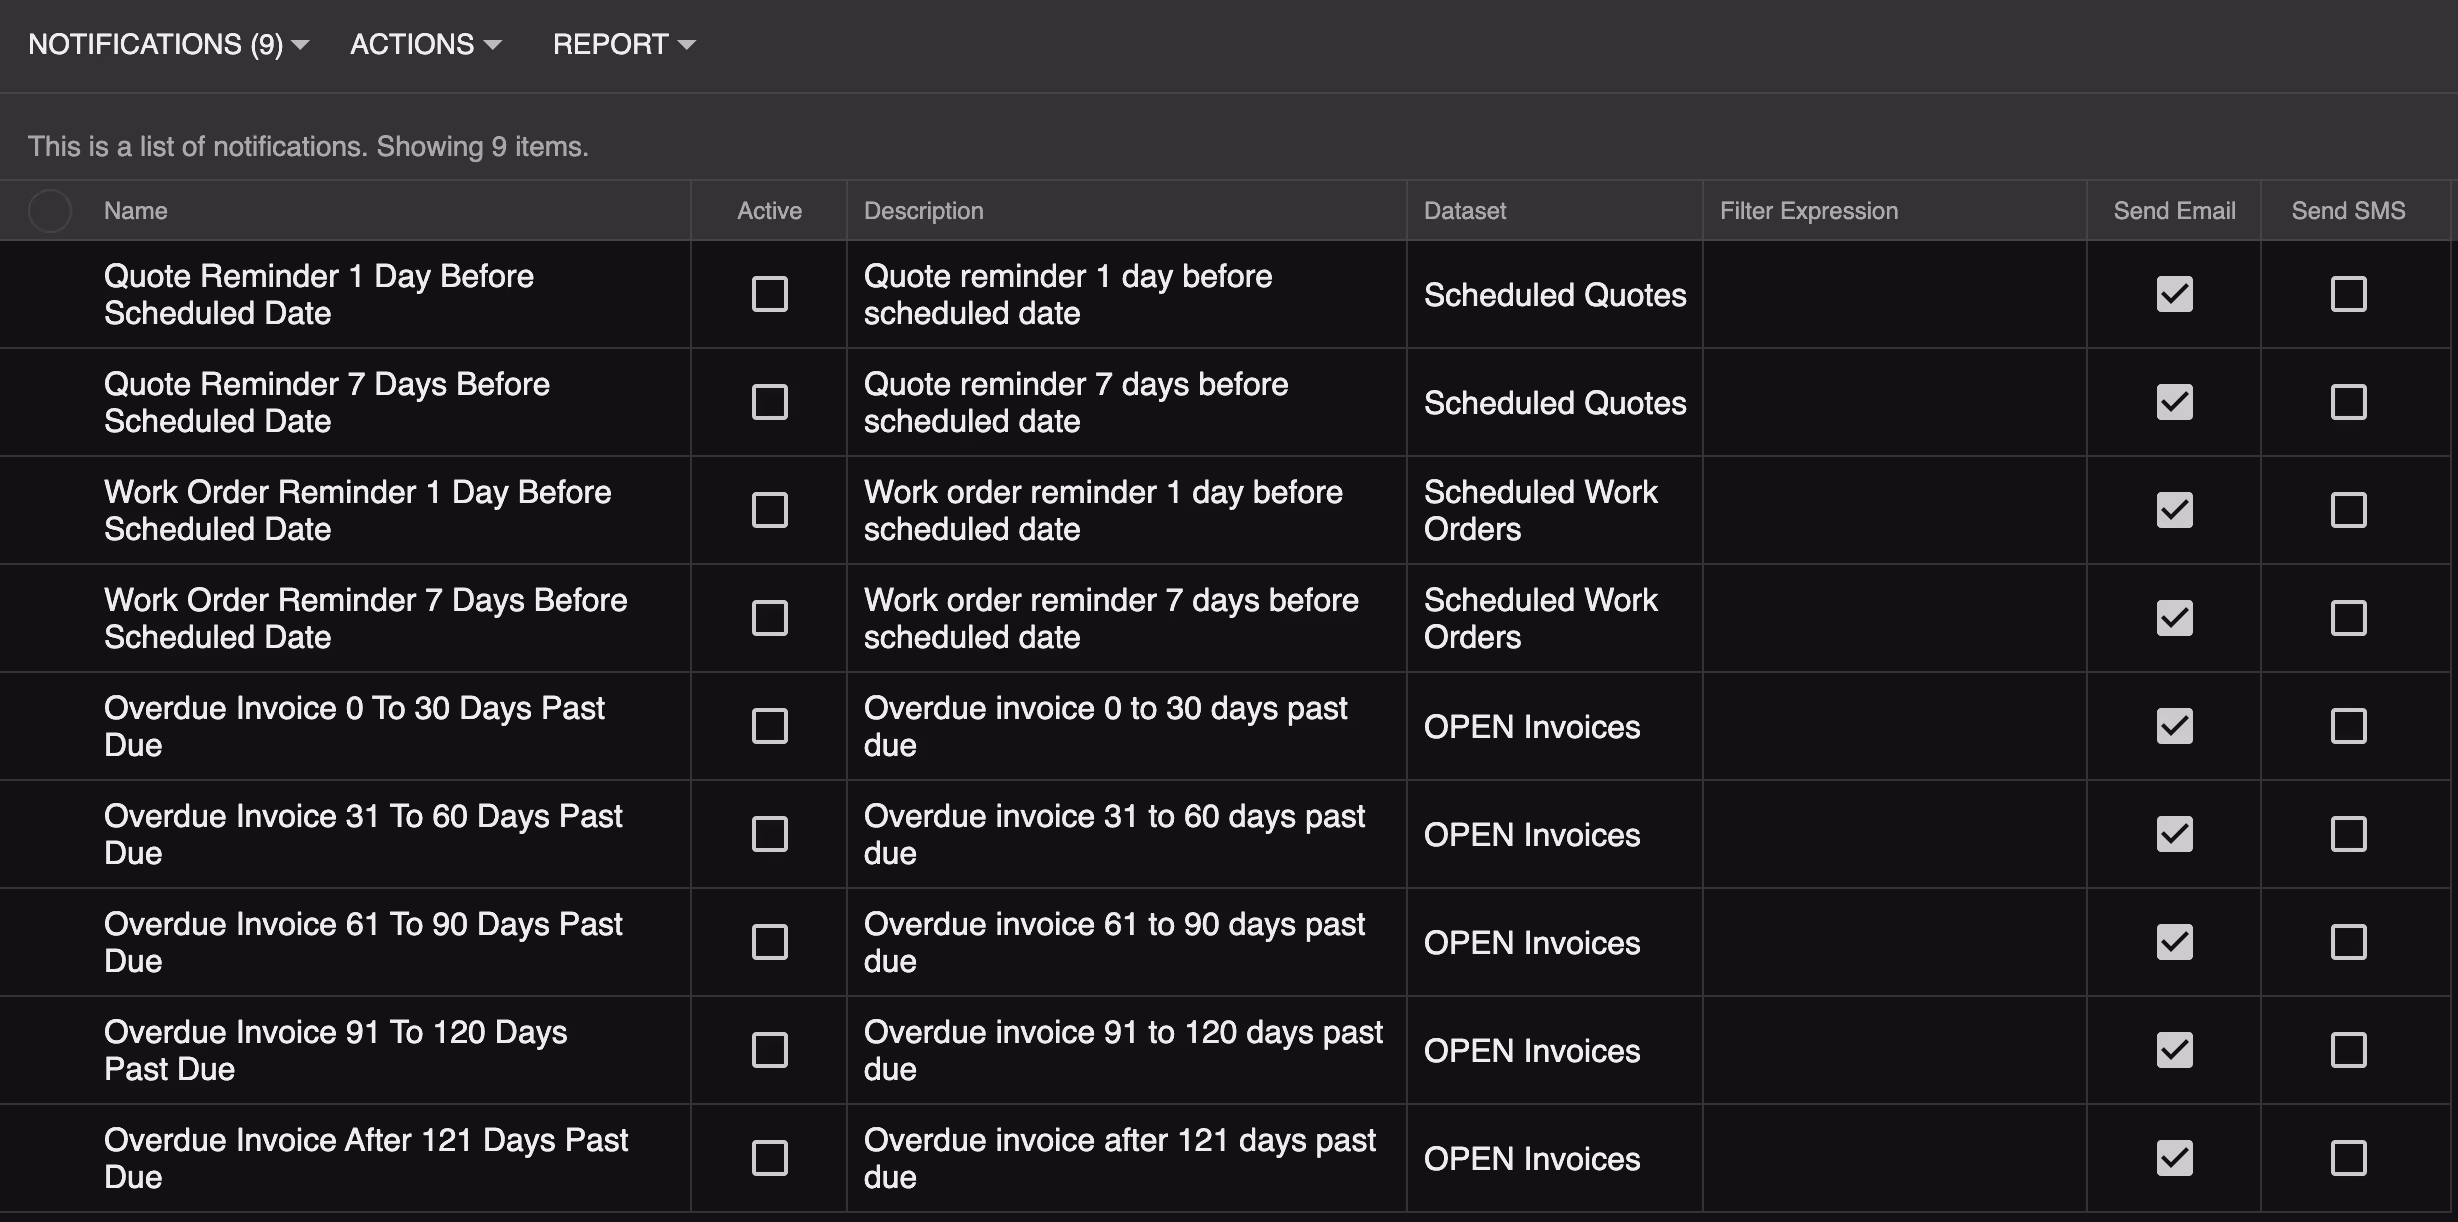
When you open Notifications, you will see that Smart Service Cloud has already created several templates for you. These cover the most common scenarios:
Work Order Reminders — Reminds customers of their upcoming scheduled appointment.
Quote Reminders — Follows up with customers who have an open, unaccepted quote.
Overdue Invoice Reminders — A series of templates that cover different overdue ranges: 0–30 days, 31–60 days, 61–120 days, and 121 or more days past due.
All of these templates are inactive by default. Nothing will be sent until you activate them.
Click on any template to open and configure it. The following walkthrough uses the Work Order Reminder as an example. Quote Reminders follow the same setup process. We will go over Invoice Reminders shortly. Hit "Edit" at the bottom of the window.
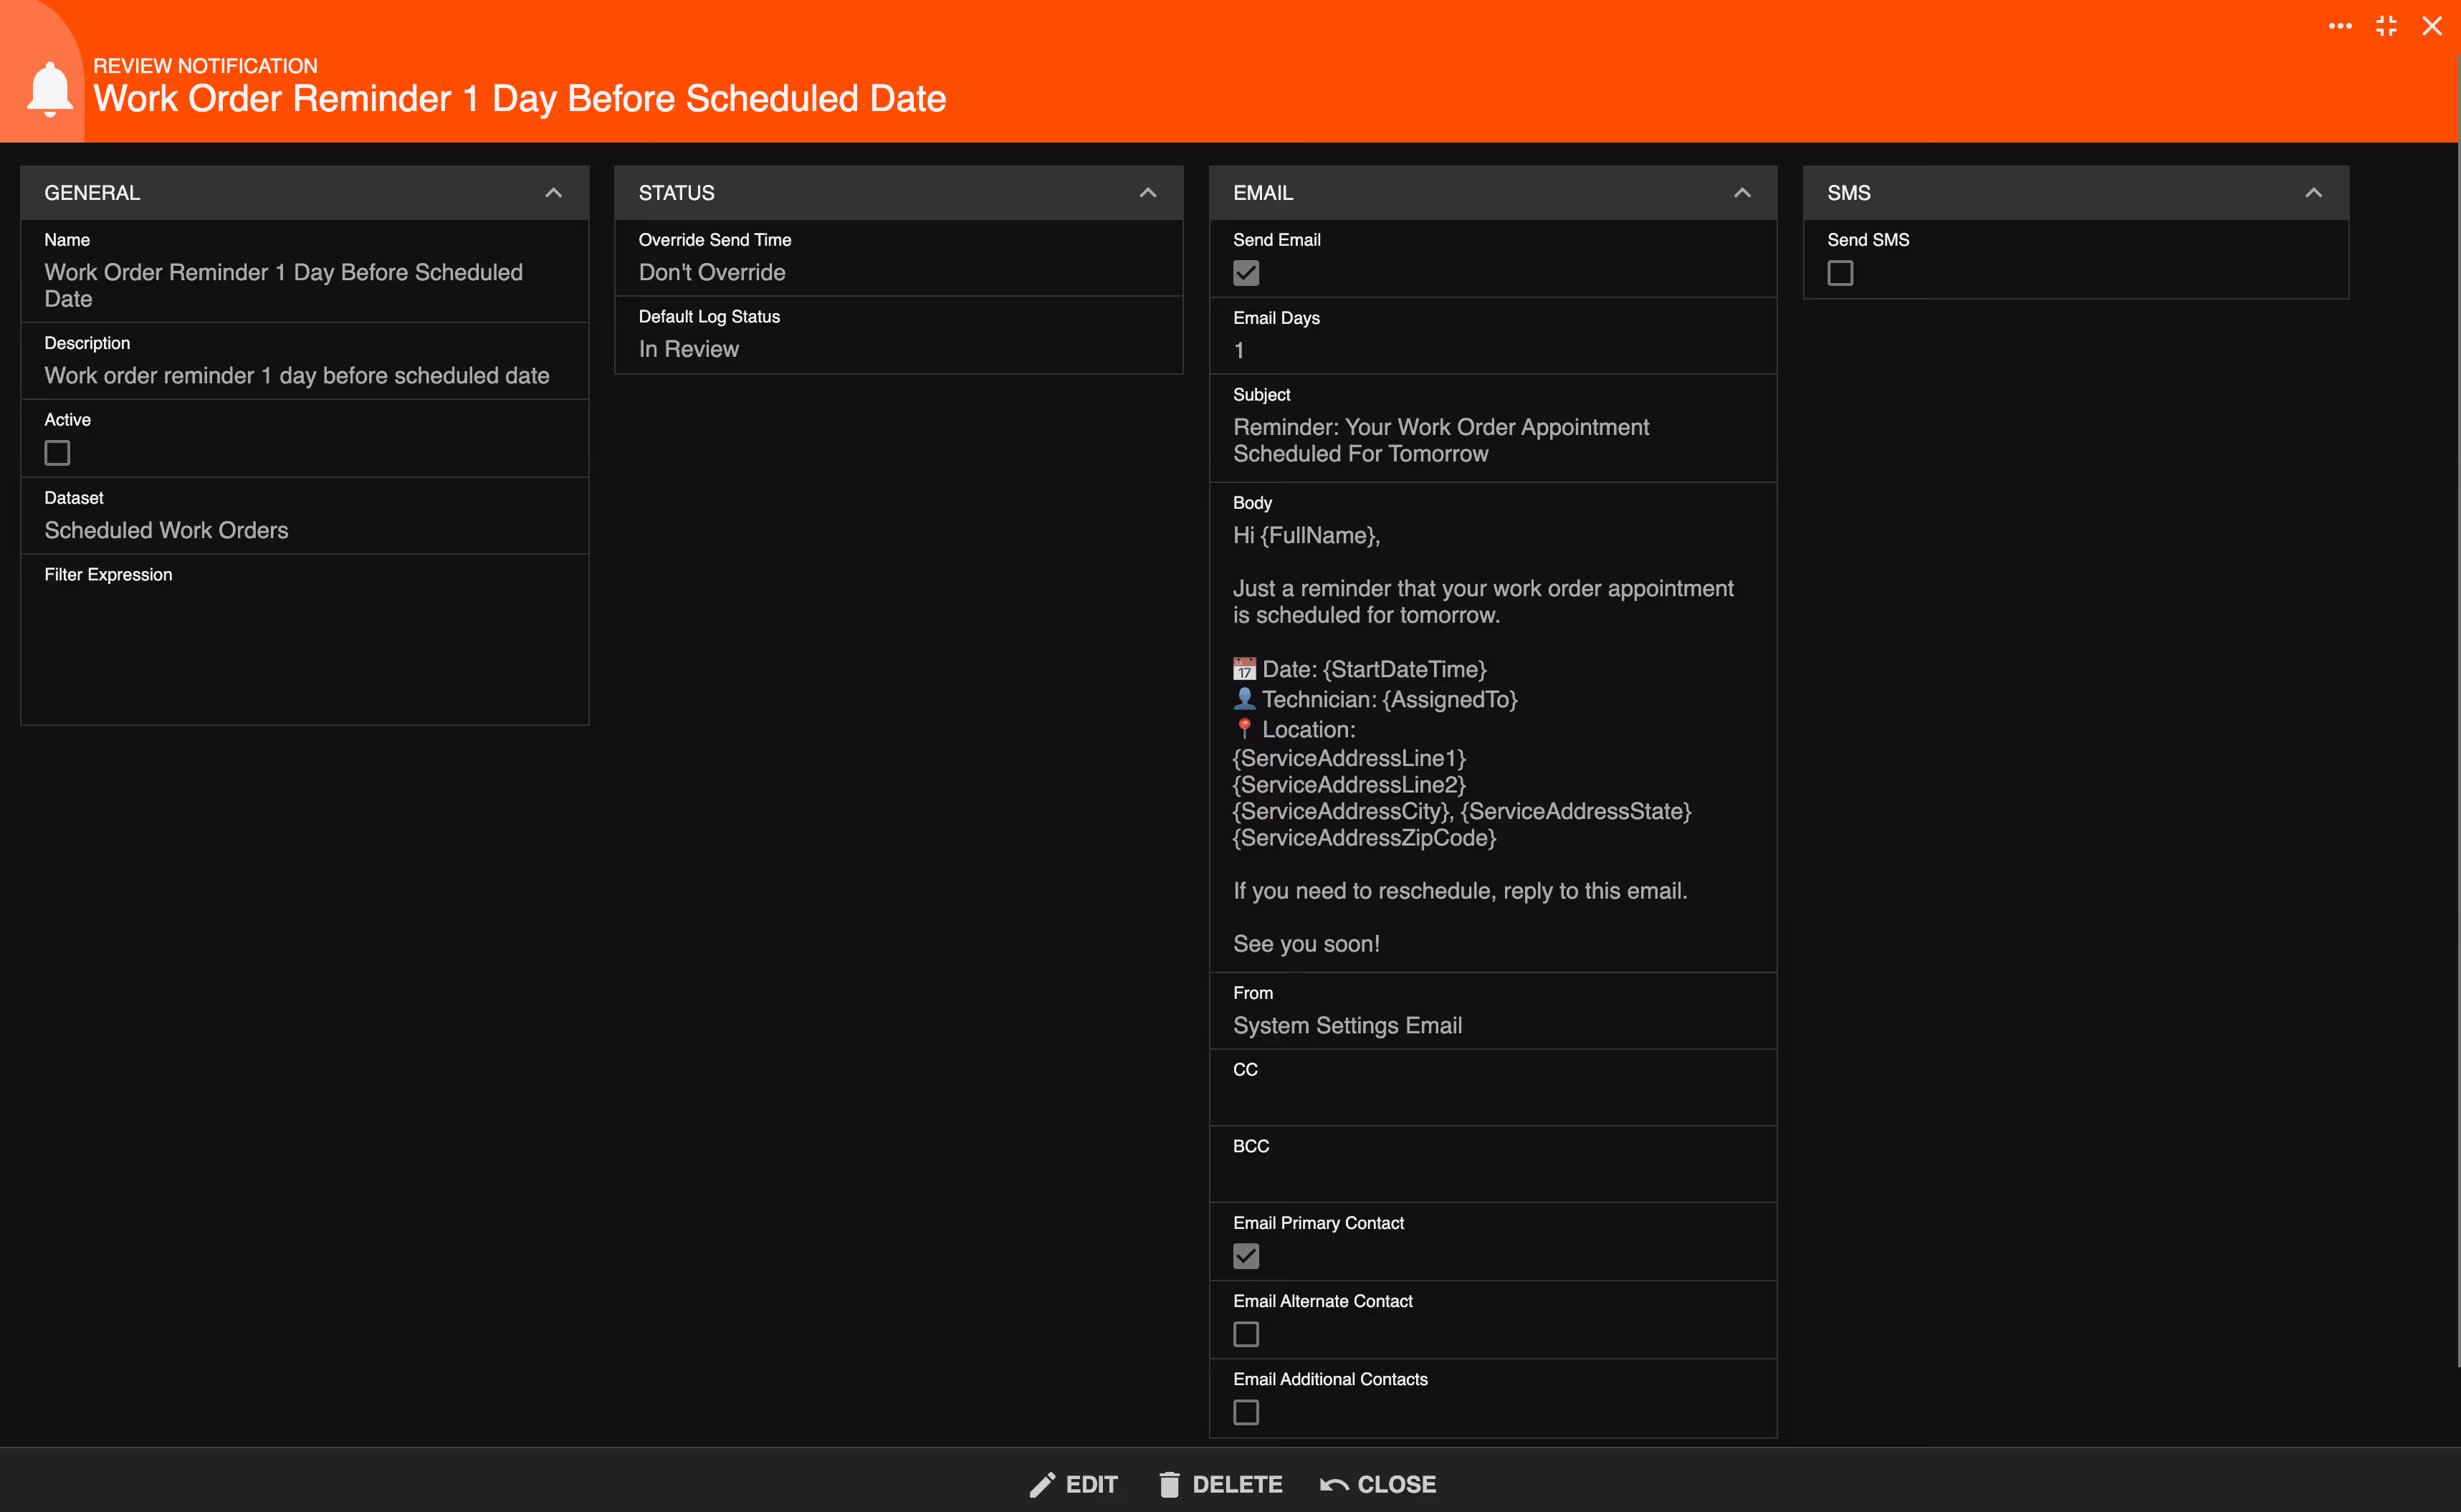
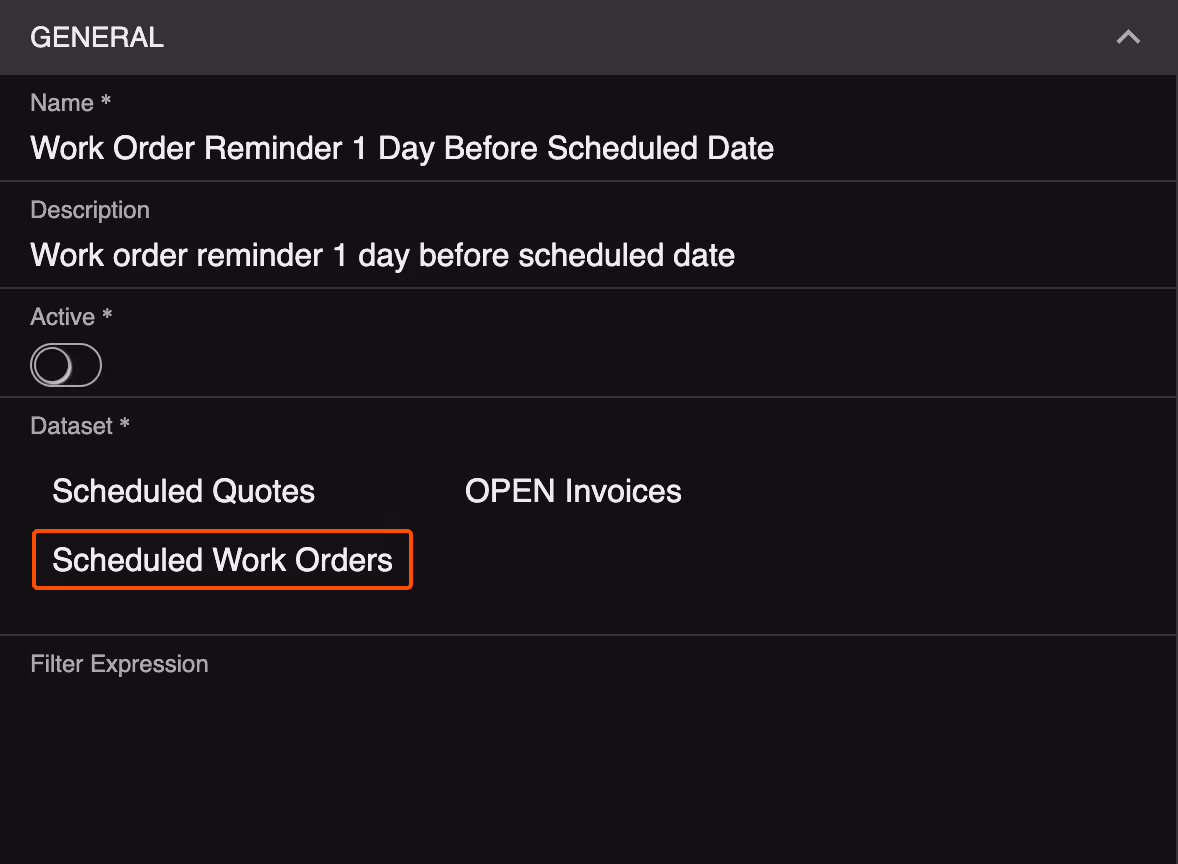
You will see the name and description of each notifification. You can also activate/deactivate the notification here.
The Data Set field tells Smart Service Cloud which records this notification applies to. For the Work Order Reminder, this is set to Scheduled Work Orders by default. This means the system will look for customers who have an upcoming scheduled appointment and send them a reminder.
The Filter field allows you to limit which customers receive the notification. This is especially useful when you are first getting set up and want to test the notification without emailing your entire customer list.
For example, you can set the filter to only send to customers whose primary email contains your own email address. This way, only you will receive the test notification. Once you have confirmed everything looks correct, you can remove the filter to allow notifications to go out to all applicable customers.
By default, the notification sends at the same time the appointment is scheduled. For example, if an appointment is scheduled for 9:00 AM on Tuesday, the reminder will go out at 9:00 AM on Monday — one day in advance.
If you prefer all reminders to send at a consistent time regardless of appointment time, enable the Override Send Time option and enter your preferred time, such as 10:00 AM.
The Default Log Status setting determines whether notifications send automatically or are held for your review first.
If you select In Review, the notification will be added to the Notification Log with an In Review status. You will need to manually approve it before it is sent. This is a good option when you are first getting started and want to keep a close eye on what goes out.
If you select Queue, the notification is automatically queued for delivery without requiring manual approval. The system checks for queued notifications once per hour and sends them at the appropriate time.
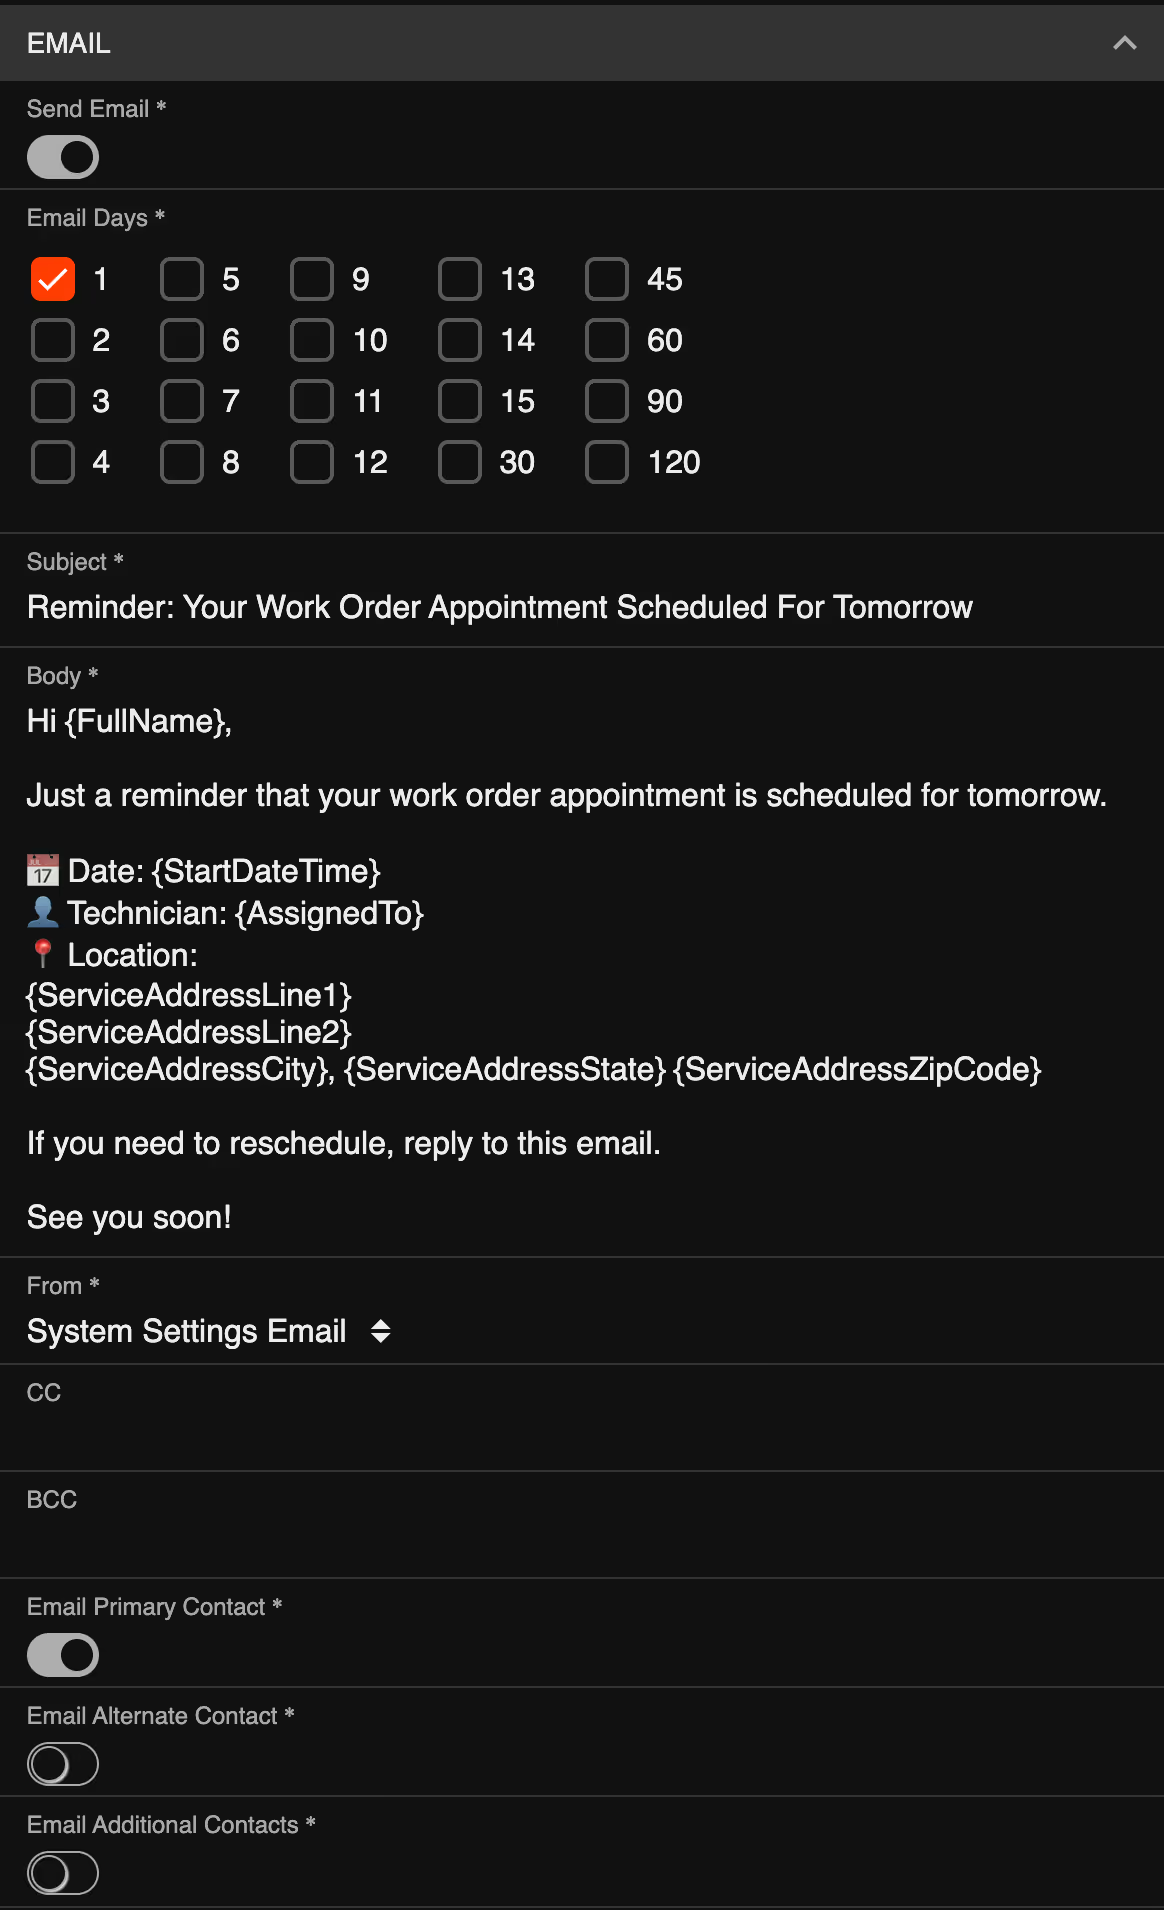
The Email Days setting controls how many days in advance the reminder is sent. If the number 1 is selected, the customer will receive their reminder one day before their scheduled appointment. You can select multiple days if you want to send more than one reminder leading up to the appointment.
Each template includes an editable subject line and email body. The default templates come pre-written, but you are encouraged to customize them to reflect your company's tone and include any details most relevant to your customers.
You will see that some of the text is surrounded by {brackets}. We call these Merge Fields and you can learn more about them by clicking on the Merge Fields Button below. These automatically pull in customer and job specific information, such as the customer's name, their appointment date, or their work order type. This lets you send personalized messages without having to write each one manually. At the bottom of the window, you will see an INSERT FIELD option where you can insert usable Merge Fields.
The From field controls which email address appears as the sender when the customer receives the notification. Your options are System Email, which uses the address set in your System Settings and is the recommended option for most businesses; Sales Rep Email, which sends from the sales rep assigned to the customer; Scheduled Employee Email, which sends from the employee assigned to the work order; or a specific employee that you choose.
By default, the notification is sent to the customer's primary contact email address. You also have the option to include the customer's alternate email address and any additional contacts associated with that customer record.
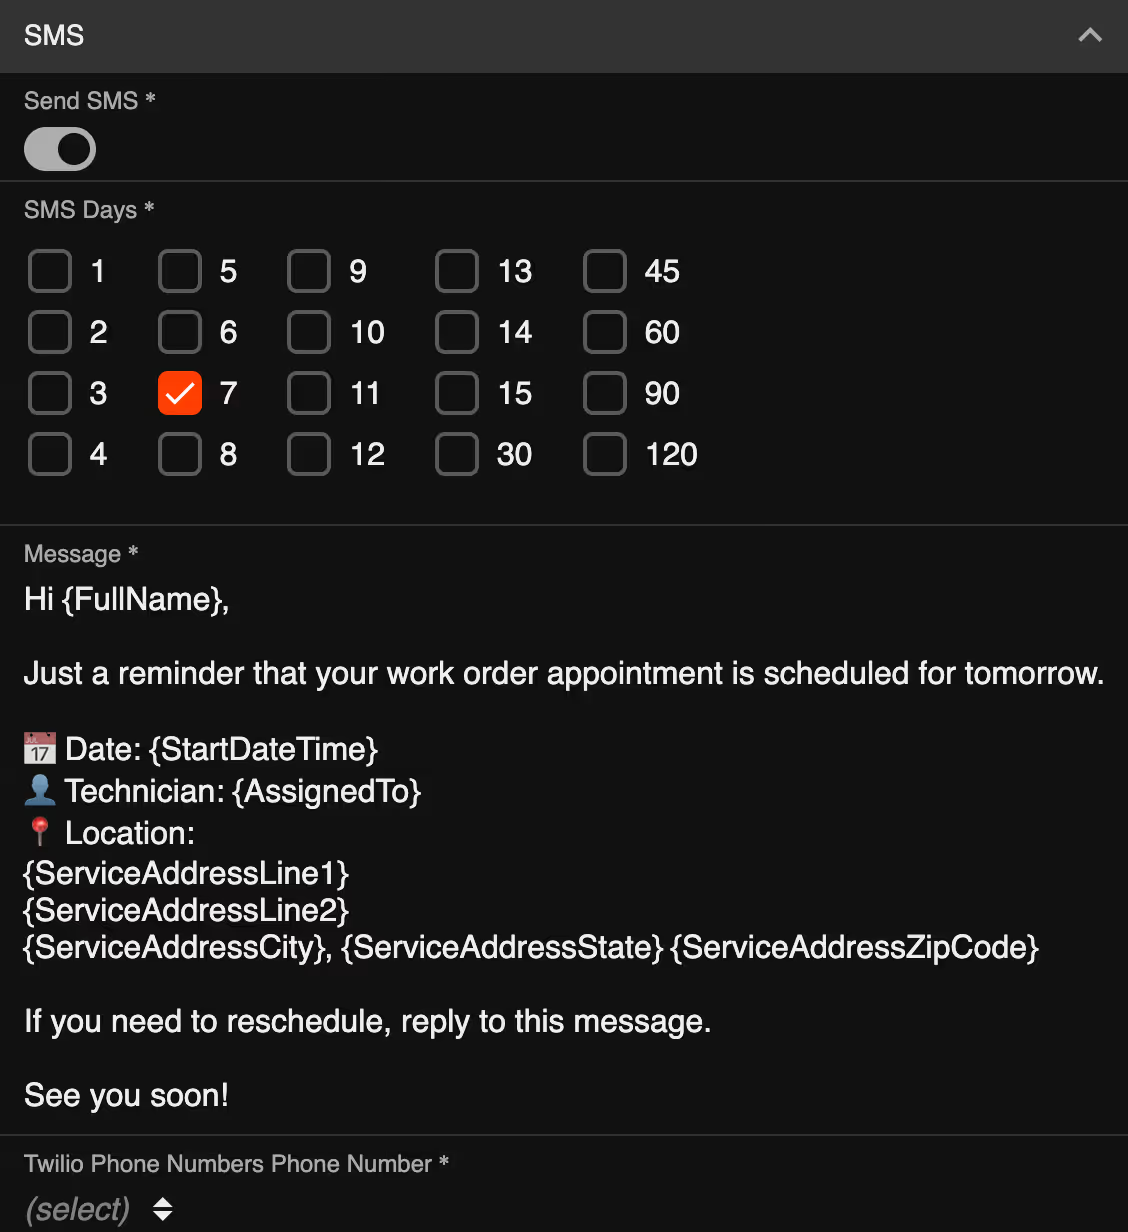
If your company uses Twilio for text messaging, you can also send this notification as an SMS. Check the Send Text Message option to enable it. A separate text message template will appear for you to customize.
Learn more about SMS Text Messaging below.
Invoice Notification templates work the same way as work order and quote reminders, with a few differences specific to payment follow-ups.
In the Invoice section of the Invoice Templates, you will see an option for Send Time. Because overdue invoices are not tied to a scheduled appointment time, you are required to set a specific time of day for the notification to send — for example, 5:00 PM.
You will also configure the overdue range and how often the reminder repeats. You can send it one time, or set it to recur on a regular interval for as long as the invoice remains unpaid within that range.
For example, the 0–30 day template can be set to send every 7 days. This means a customer with an overdue invoice will receive a reminder the day it becomes overdue, then again at 7 days, 14 days, 21 days, and 28 days — until the invoice is paid or moves into the next range.
Smart Service Cloud includes default invoice templates that cover the following overdue ranges: 0 to 30 days past due, 31 to 60 days past due, 61 to 120 days past due, and 121 or more days past due.
You also have the option to base the notification on either the invoice date or the due date. If you select invoice date, the overdue range is calculated from the date the invoice was created. If you select due date, the range is calculated from the date payment was due. Most businesses will want to use due date, as that more accurately reflects when the invoice actually becomes overdue.

Go to Administration Center and click on Notification Logs to see a full history of all notifications. At the top-left of the window, you can view Email and Text Messages that were sent, in review, queued, and have errors.

If your template is set to In Review, notifications will appear in the Email in Review log and wait for your approval before being sent. After reviewing, you can click on the three dots next to the notification name and select Set to Queued.
To approve multiple notifications at once, use the checkboxes to select them, then click on Set to Queue for delivery.
Once a notification is in the queue, the system will pick it up within the next hourly processing cycle and send it at the appropriate time.
To create a new Notification template, simply click on the plus symbol on the bottom-right of the Notifications list.