
Overview
Insight Feeds allow you to automate the delivery of business reports by email or SMS. Create customized reports using your business data, then schedule them to be delivered automatically at the time and frequency that best fits your needs.
Insight Feeds can be configured to:
- Email detailed reports in HTML, CSV, or Tab Delimited format
- Send KPI summaries by SMS
- Send brief SMS updates
- Automatically deliver scheduled reports without manual intervention
Benefits
Creating an Insight Feed
When creating a new Insight Feed, work through four configuration tabs. Click a tab below to explore each one.
General Tab
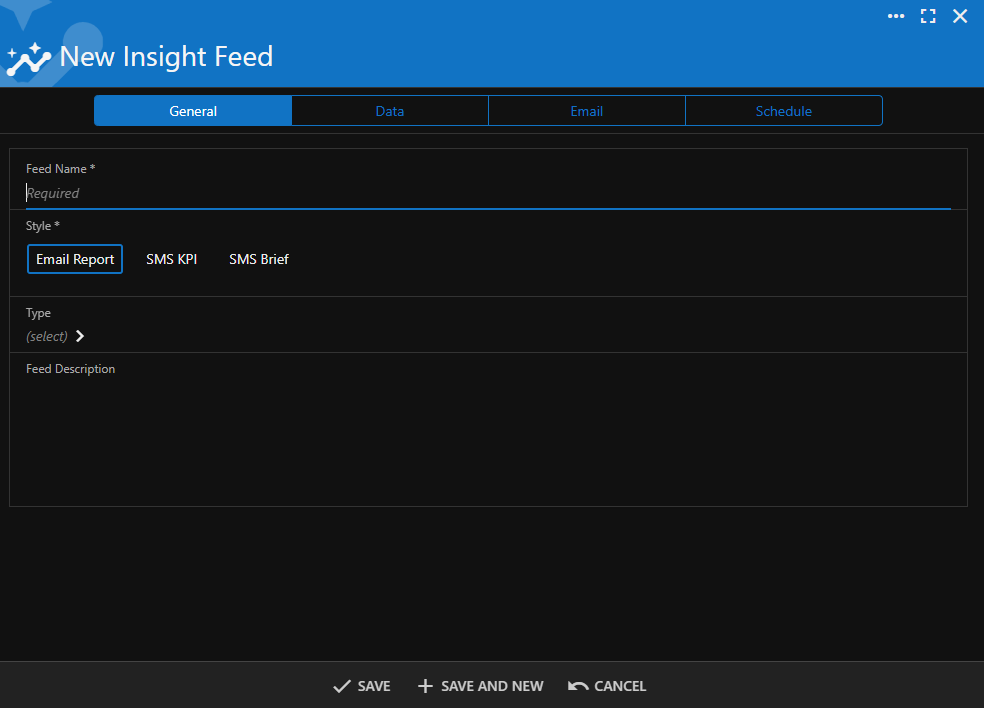
The General tab defines the basic settings for your Insight Feed — its name, delivery style, report type, and an optional description.
| Field | Description |
|---|---|
| Feed Name | A descriptive name for the feed, such as “Weekly Revenue Summary.” |
| Style | How the feed is delivered: Email Report, SMS KPI, or SMS Brief. |
| Type | The report type associated with this feed. |
| Feed Description | Optional notes about the purpose or intended audience. |
Data Tab
The Data tab determines what information is included. Select a dataset, choose fields, apply filters, set sort order, and optionally group results.
Here is a document detailing how to create filters for notifications and insight feeds. It is based on the Appointments dataset and includes examples to help customers create their own filters.
↓ Download Filter Examples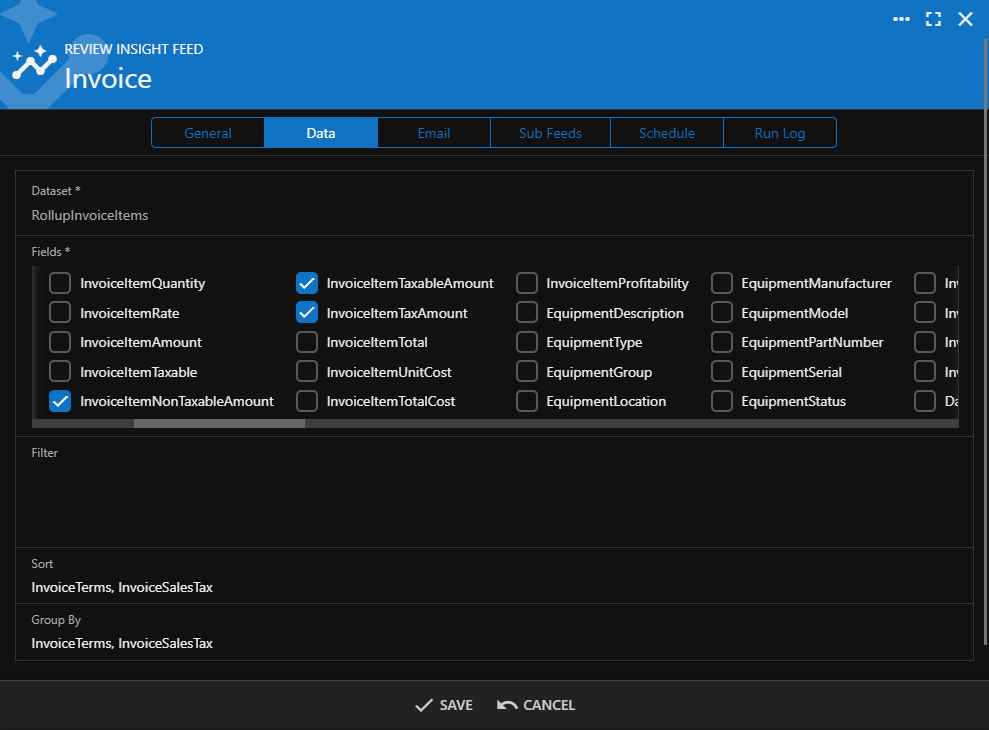
Select a Dataset
Choose the data source your report will pull from.
Select Fields
After choosing a dataset, select the specific fields to include, including customer information, contacts, addresses, work orders, appointments, invoices, payments, sales data, user-defined fields, tags, revenue totals, quote metrics, invoice metrics, and more.
Filter
Apply filters to limit the report to records meeting specific criteria, such as active customers, completed work orders, current-month invoices, or a specific sales representative.
Sort
Define the order in which report data is presented, such as Customer Name, Invoice Date, Appointment Date, or Revenue.
Group By
Organize results into logical sections. Reports support grouping by available fields, including Rollup Views where applicable.
Email Tab
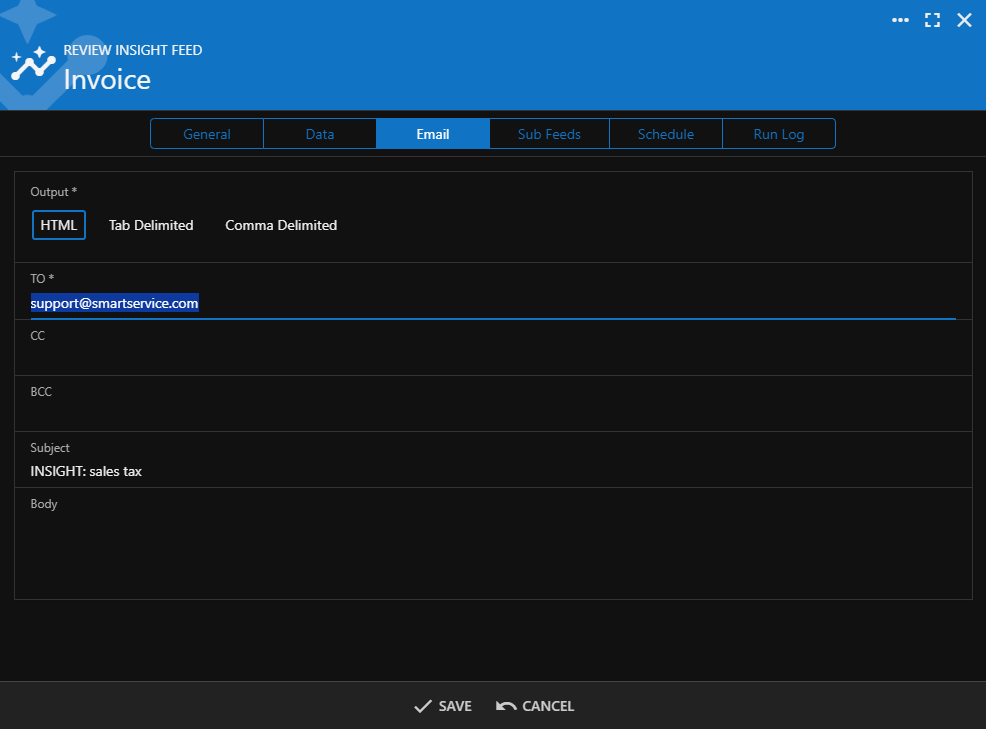
The Email tab controls how the report is packaged and sent — output format, recipients, subject line, and optional body text.
Output Format
- HTML — A formatted report viewable directly in most email clients.
- Tab Delimited — Plain-text file with tab-separated columns.
- Comma Delimited (CSV) — Ideal for importing into Microsoft Excel.
Recipients
| Field | Description |
|---|---|
| To | Primary recipients who will receive the report. |
| CC | Recipients who receive a copy. |
| BCC | Recipients who receive a hidden copy. |
Subject
The subject line that appears in the recipient’s inbox.
Body
Optional introductory text that appears above the report content.
Schedule Tab
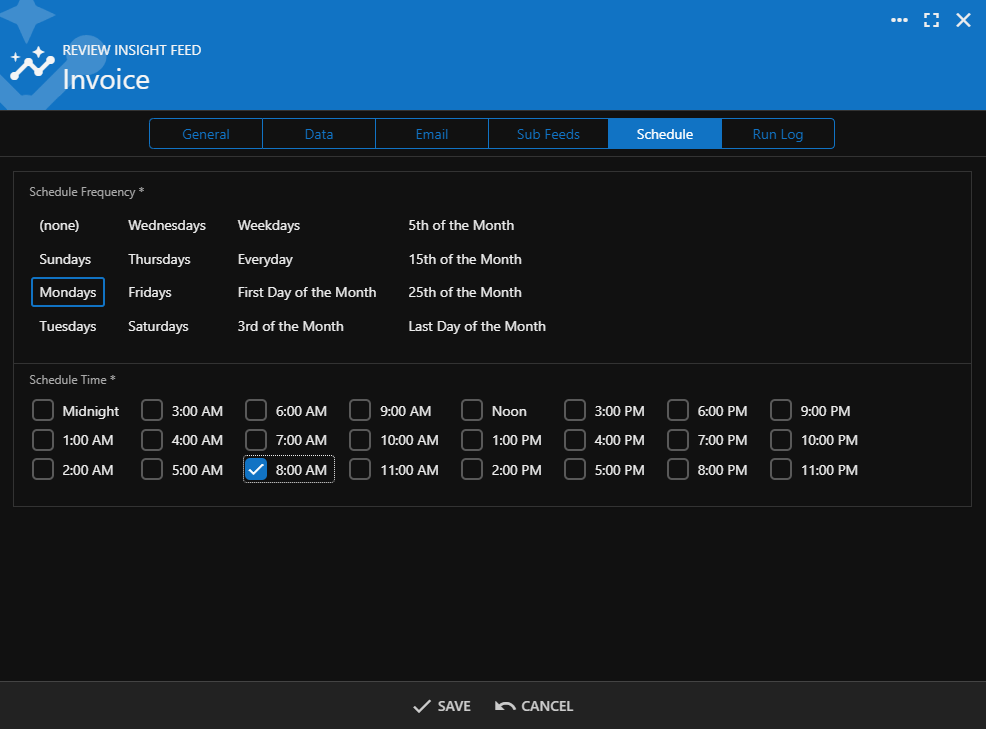
The Schedule tab automates delivery. Set how often the report runs and what time it generates.
Schedule Frequency
Choose how often the report runs:
Schedule Time
Select the hour the report generates each scheduled day — every hour from Midnight through 11:00 PM.
Supported Delivery Types
Insight Feeds support three delivery styles depending on how much detail recipients need.
Email Report
Detailed report sent to one or more recipients.
- HTML
- CSV
- Tab Delimited
SMS KPI
Concise text message with key performance indicators for daily or weekly pulse checks.
SMS Brief
Short text summary for high-level awareness without email.
Rollup Views
Insight Feeds support Rollup Views for grouped, summarized data. When available for your dataset, group results by RollupGrouping1, RollupGrouping2, or RollupGrouping3.
Sub Feeds
Sub feeds allow customers to send emails to subcontractors or external contractors regarding outstanding tasks or billing. This enables your company to distribute Insight Feed reports to contacts who are not internal employees.
To use sub feeds, create a customer record within your database, such as “Insight Feeds Contacts”, and add the contractors as additional contacts under that record.
Creating a Sub Feed
- Create and save the initial Insight Feed report.
- Reopen the Insight Feed and select Edit.
- Click on the Subfeeds tab.
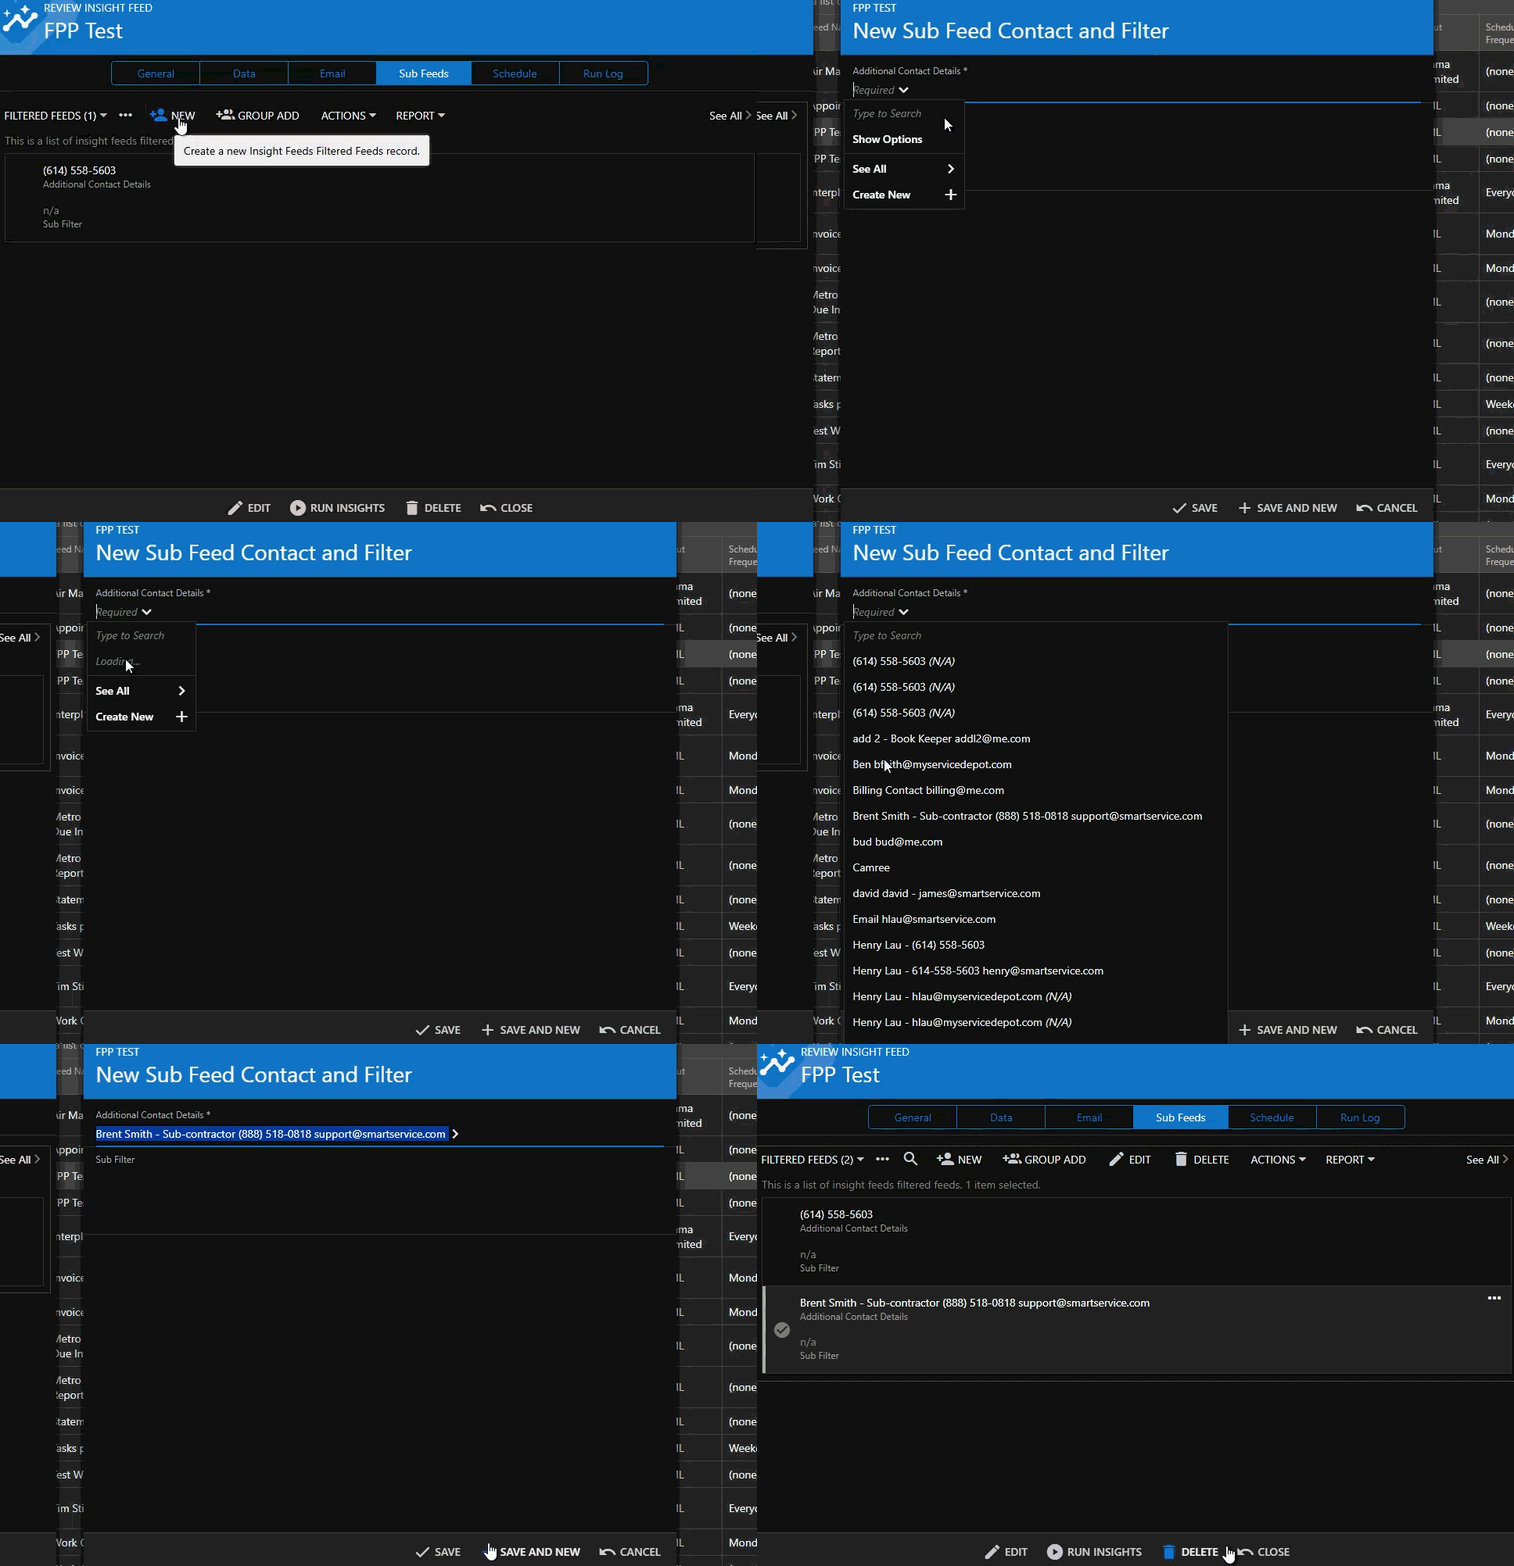
- To add individual contacts, select New, choose the specific additional contact record, and click Save.
Adding a Group of Contacts
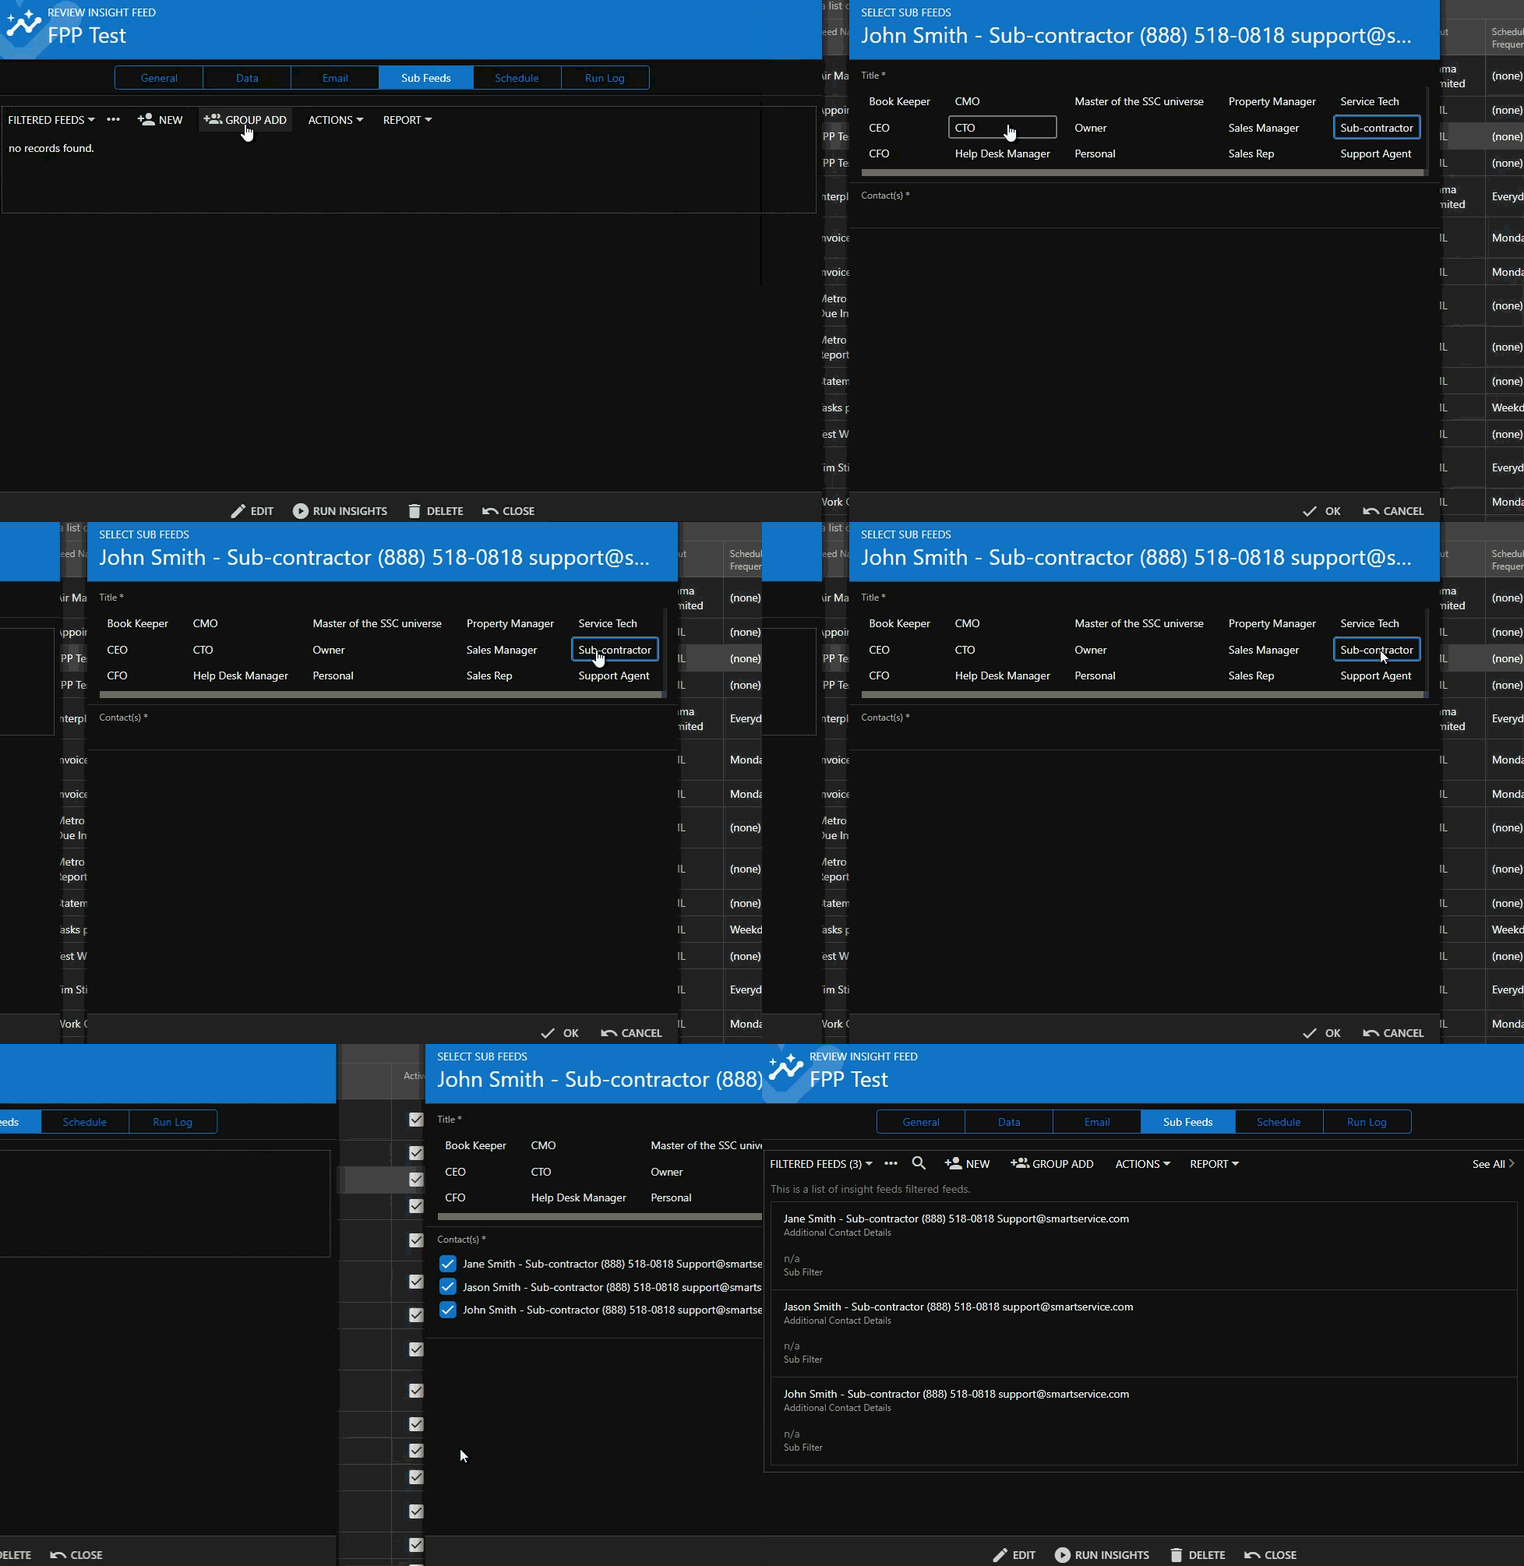
To add a group of contacts, enable the sub feed for a specific assigned title, such as “Contractor” or “Subcontractor.” The system will search all customer records for contacts matching that title and automatically send the Insight Feed report to them.
Run Log
Smart Service Cloud maintains an audit log of every instance where the system sends an Insight Feed report. This log allows you to verify whether a report was delivered successfully or if an exception prevented it from being sent to the specified email addresses.
Accessing and Viewing the Run Log
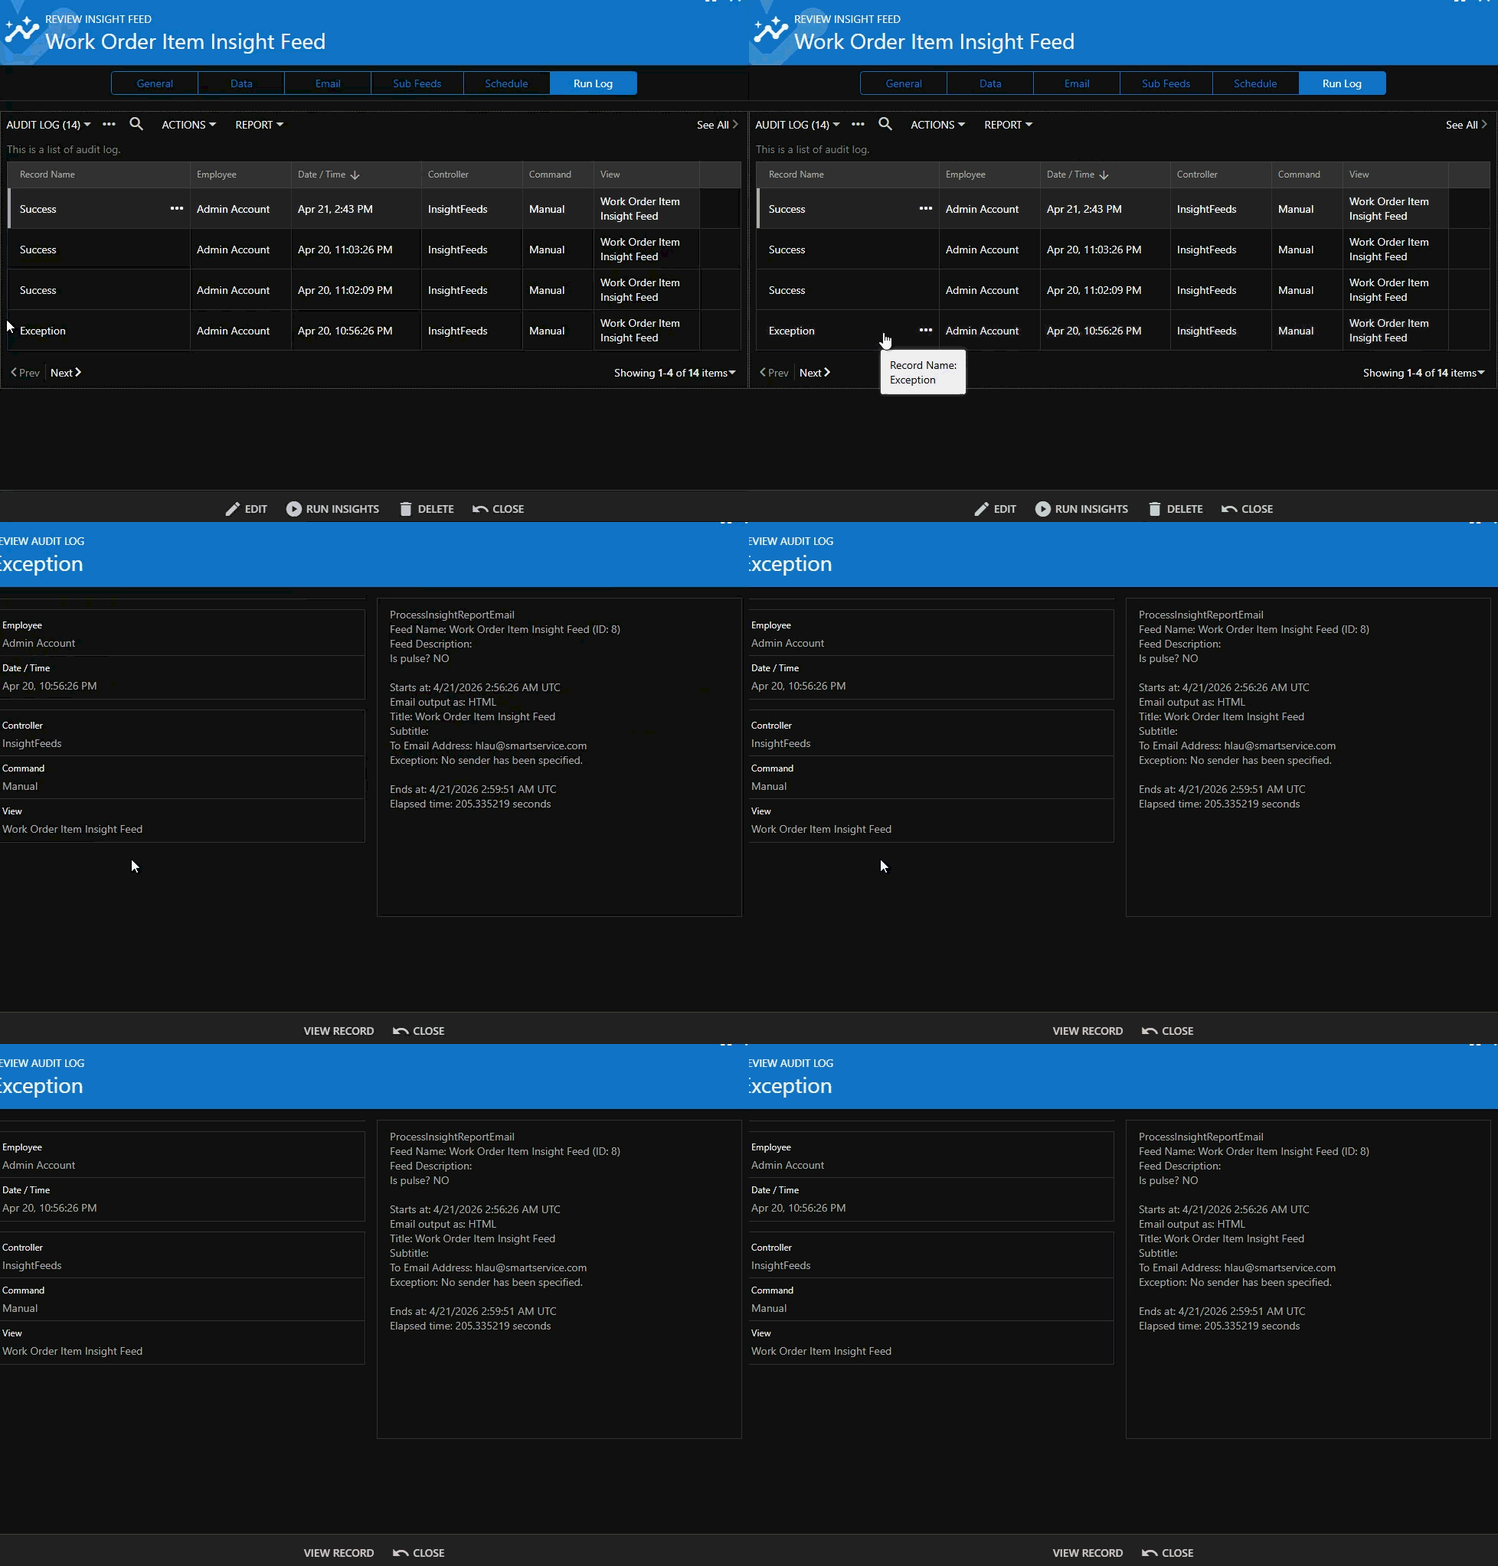
- Open the specific Insight Feed report and select the Run Log tab to display the audit log listing past delivery attempts.
- Click on any instance row to view detailed information about that specific attempt, including employee details, date and time, report name, and delivery format (email or text).
Exceptions and Errors
If an exception occurred, an error message will display. For example:
Errors usually indicate an issue with a filter added to the report. Ensure all custom filters follow T-SQL format.
Testing an Insight Feed
Once your Insight Feed report and recipients are configured, you can test the delivery to confirm it functions properly.
Run a Test
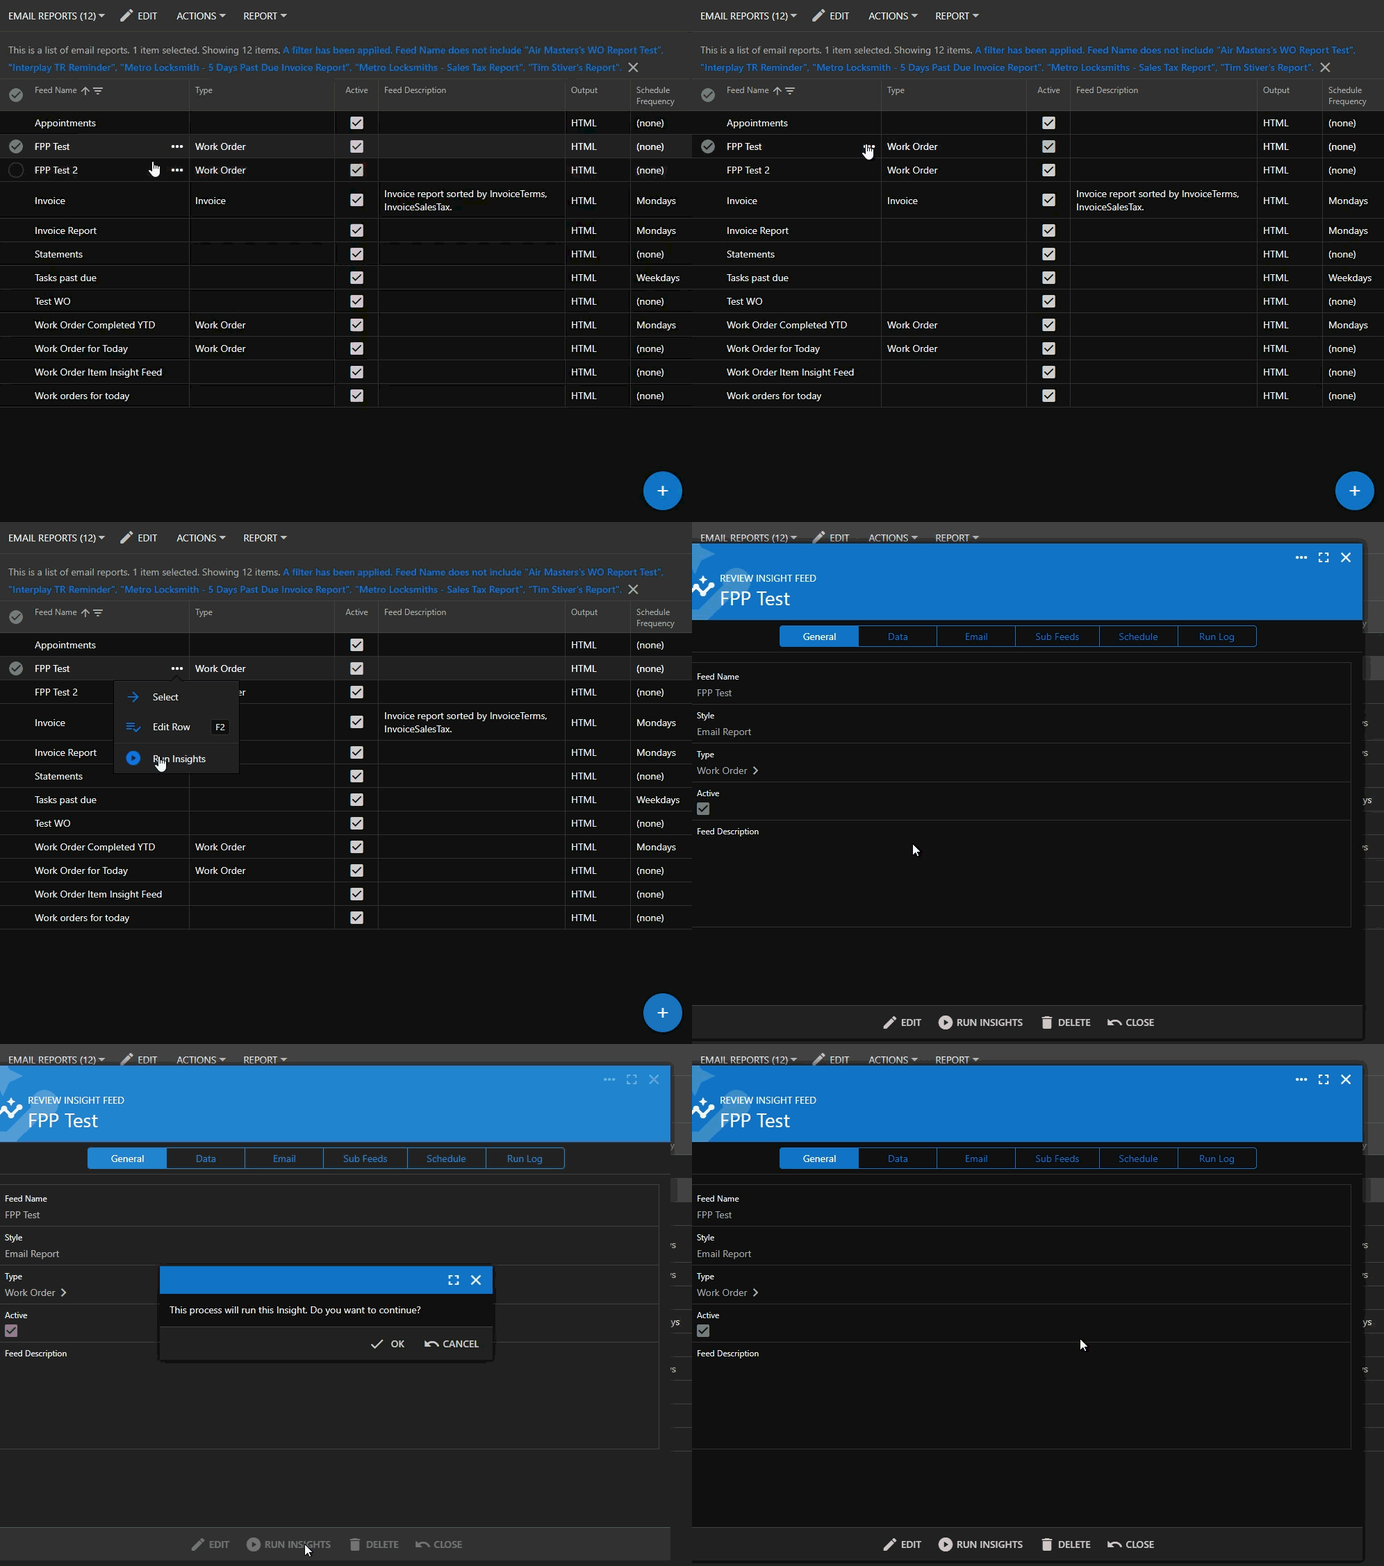
- Click the three dots to the right of the report name and select Run Insights, or open the report directly and select Run Insights from the bottom of the feed.
Review the Test Run
- Reopen the report and check the Run Log tab to review the status of the test run.
We recommend including your own email address as a recipient during testing so you can review the generated report output directly.
Best Practices
- 1 Use descriptive feed names. “Monday Morning Revenue Report” is easier to manage than “Report 1.”
- 2 Apply filters to reduce noise. Limit reports to relevant customers, invoices, representatives, or other criteria.
- 3 Group related information. Group By and Rollup Views make large datasets easier to read.
- 4 Use CSV for analysis. CSV is ideal when recipients will work with the report in Excel.
- 5 Schedule during off-hours. Running heavier reports overnight can reduce business-hour performance impact.