Have a question? Enter a search term. Or give us a call at 1-888-518-0818

Smart Service Cloud brings work orders into the digital age, serving as a high-tech clipboard that houses all the schedules and job information the modern field service pro needs to work effectively. With a Smart Service Cloud account and this app, field workers have instant access to all the forms and customer information normally housed in the office.
If your company has chosen to take advantage of our Digital Forms feature, this article will provide you with information on how to set it all up and how to use the Digital Forms to perform the work.
Also, you will learn how to get the job done if Digital Forms are not being used.
This feature is available only on iOS devices, supporting iPhones with iOS 15.0 or later and iPads with iPadOS 15.0 or later.
Step 1: Download Smart Service Cloud App
Search for "Smart Service Cloud" in your device's App Store and download the application. If you already have the app installed, please delete and reinstall it to ensure you receive the latest update.
.png)
Step 2: Configure Your Account to the App
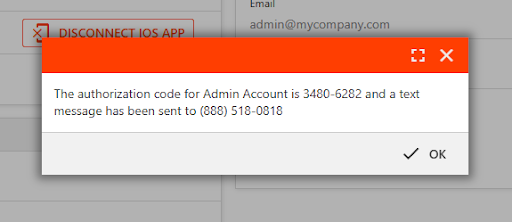
To connect an employee to the iOS app, navigate to your Smart Service database, go to Human Resources > Employees, and select an active employee. After clicking "Edit," enter a mobile phone number and save. Re-entering the employee's record will reveal the option to connect to the iOS app.
Select the option to reveal an authorization code. Within the iOS app, navigate to the 'Initial Configuration' page (following any initial prompts). Here, in Step 1, enter the authorization code. Remember to 'Check Authorization Code' before proceeding with the remaining steps.
.png)
Your company might choose to use Digital Forms for some, or all of your services. If your company won't be using Digital Forms, you can skip this step.

Using Digital Forms eliminates the need for your field users to learn new software by providing them a quick and convenient way to access their work orders in a familiar form.
Where they’d typically use a pen or pencil, the field user can tap into the fields of the form and access the appropriate options for writing in their own text.
Once the work is completed, they can send the form back to the office with a simple click.
You can make a request to add a fillable form or create a customized form. A member of our custom development team will reach out to you from there to discuss your digital form.
Once we’ve completed your customized mobile app form, we’ll give you a call to implement the form and configure your devices.
When you want to use a PDF form inside of SMART SERVICE CLOUD, you’ll need to reach out to our custom development team to receive your customized document. We offer form customization at a rate of $200.00 per hour, lasting a minimum of one hour. Time spent on forms greater than an hour will be billed at a rate of $50.00 per quarter-hour. Forms are completed in the order in which they are received, availability is dictated by the volume of form submissions received. While on average, a PDF Form takes 2-3 hours to create, please note that each form is different and therefore may require additional time.
Forms created by My Service Depot are covered by your Smart Service Cloud subscription plan, provided that your subscription is valid at the time of inquiry. My Service Depot is not responsible for the forms you create, or issues that arise with your PDF form. However, you may commission My Service Depot to assist with the development or troubleshooting of your PDF Form at a rate of $200.00 an hour, lasting a minimum of one hour. Time spent on forms greater than an hour will be billed at a rate of $50.00 per quarter-hour.
You can provide the instructions below to your field team members to guide them through the features available to them in the Mobile App. Also, you can send them this link to the video tutorial.
The first step to starting your day will be clocking in and familiarizing yourself with the various time clock functions in the app. These time punches will be reported back to the office users and can be used to track your time punches for work and for each service you perform. Let’s get started with clocking in for the day.


You can click on these images to expand them.
You can access your time clock by tapping on the time clock symbol at the top right-hand corner of the app and selecting the time punch you wish to enter from the resulting window.
As you can see on the left, you tap the time clock symbol which opens up a new window with a “clock in for the day” button.
If you go back into that window after clocking in, you will have more options available to you for tracking lunches, breaks, and clocking out.
All of these time punches, as well as the locations on the map will be tracked back in the office.
If you make a mistake when enter time punches, make a note and contact your office so they can review and correct the time entry for you.
If you’re an office user looking to assist the technician with correcting their time punches or if you would like to see where this data is stored, you can check out our article about Time Cards.


Now that you’re clocked in and ready to get started for the day you should download a copy of your schedule. We recommend you get in the habit of syncing often, even before starting your next task to see if the schedule you have in front of you is still accurate.
If the office assigns a new service to you or rescheduled a service for a customer, syncing often will keep you up to date on the tasks ahead.
Syncing the device is as easy as tapping the three horizontal lines opposite the time punches button and tapping the “sync” option from the resulting list.
There are other options in this list and we’ll provide a description below but those buttons aren’t important for our tutorial just yet.
So make sure you sync often or at least once a day to make sure you have an accurate schedule before you get to work.
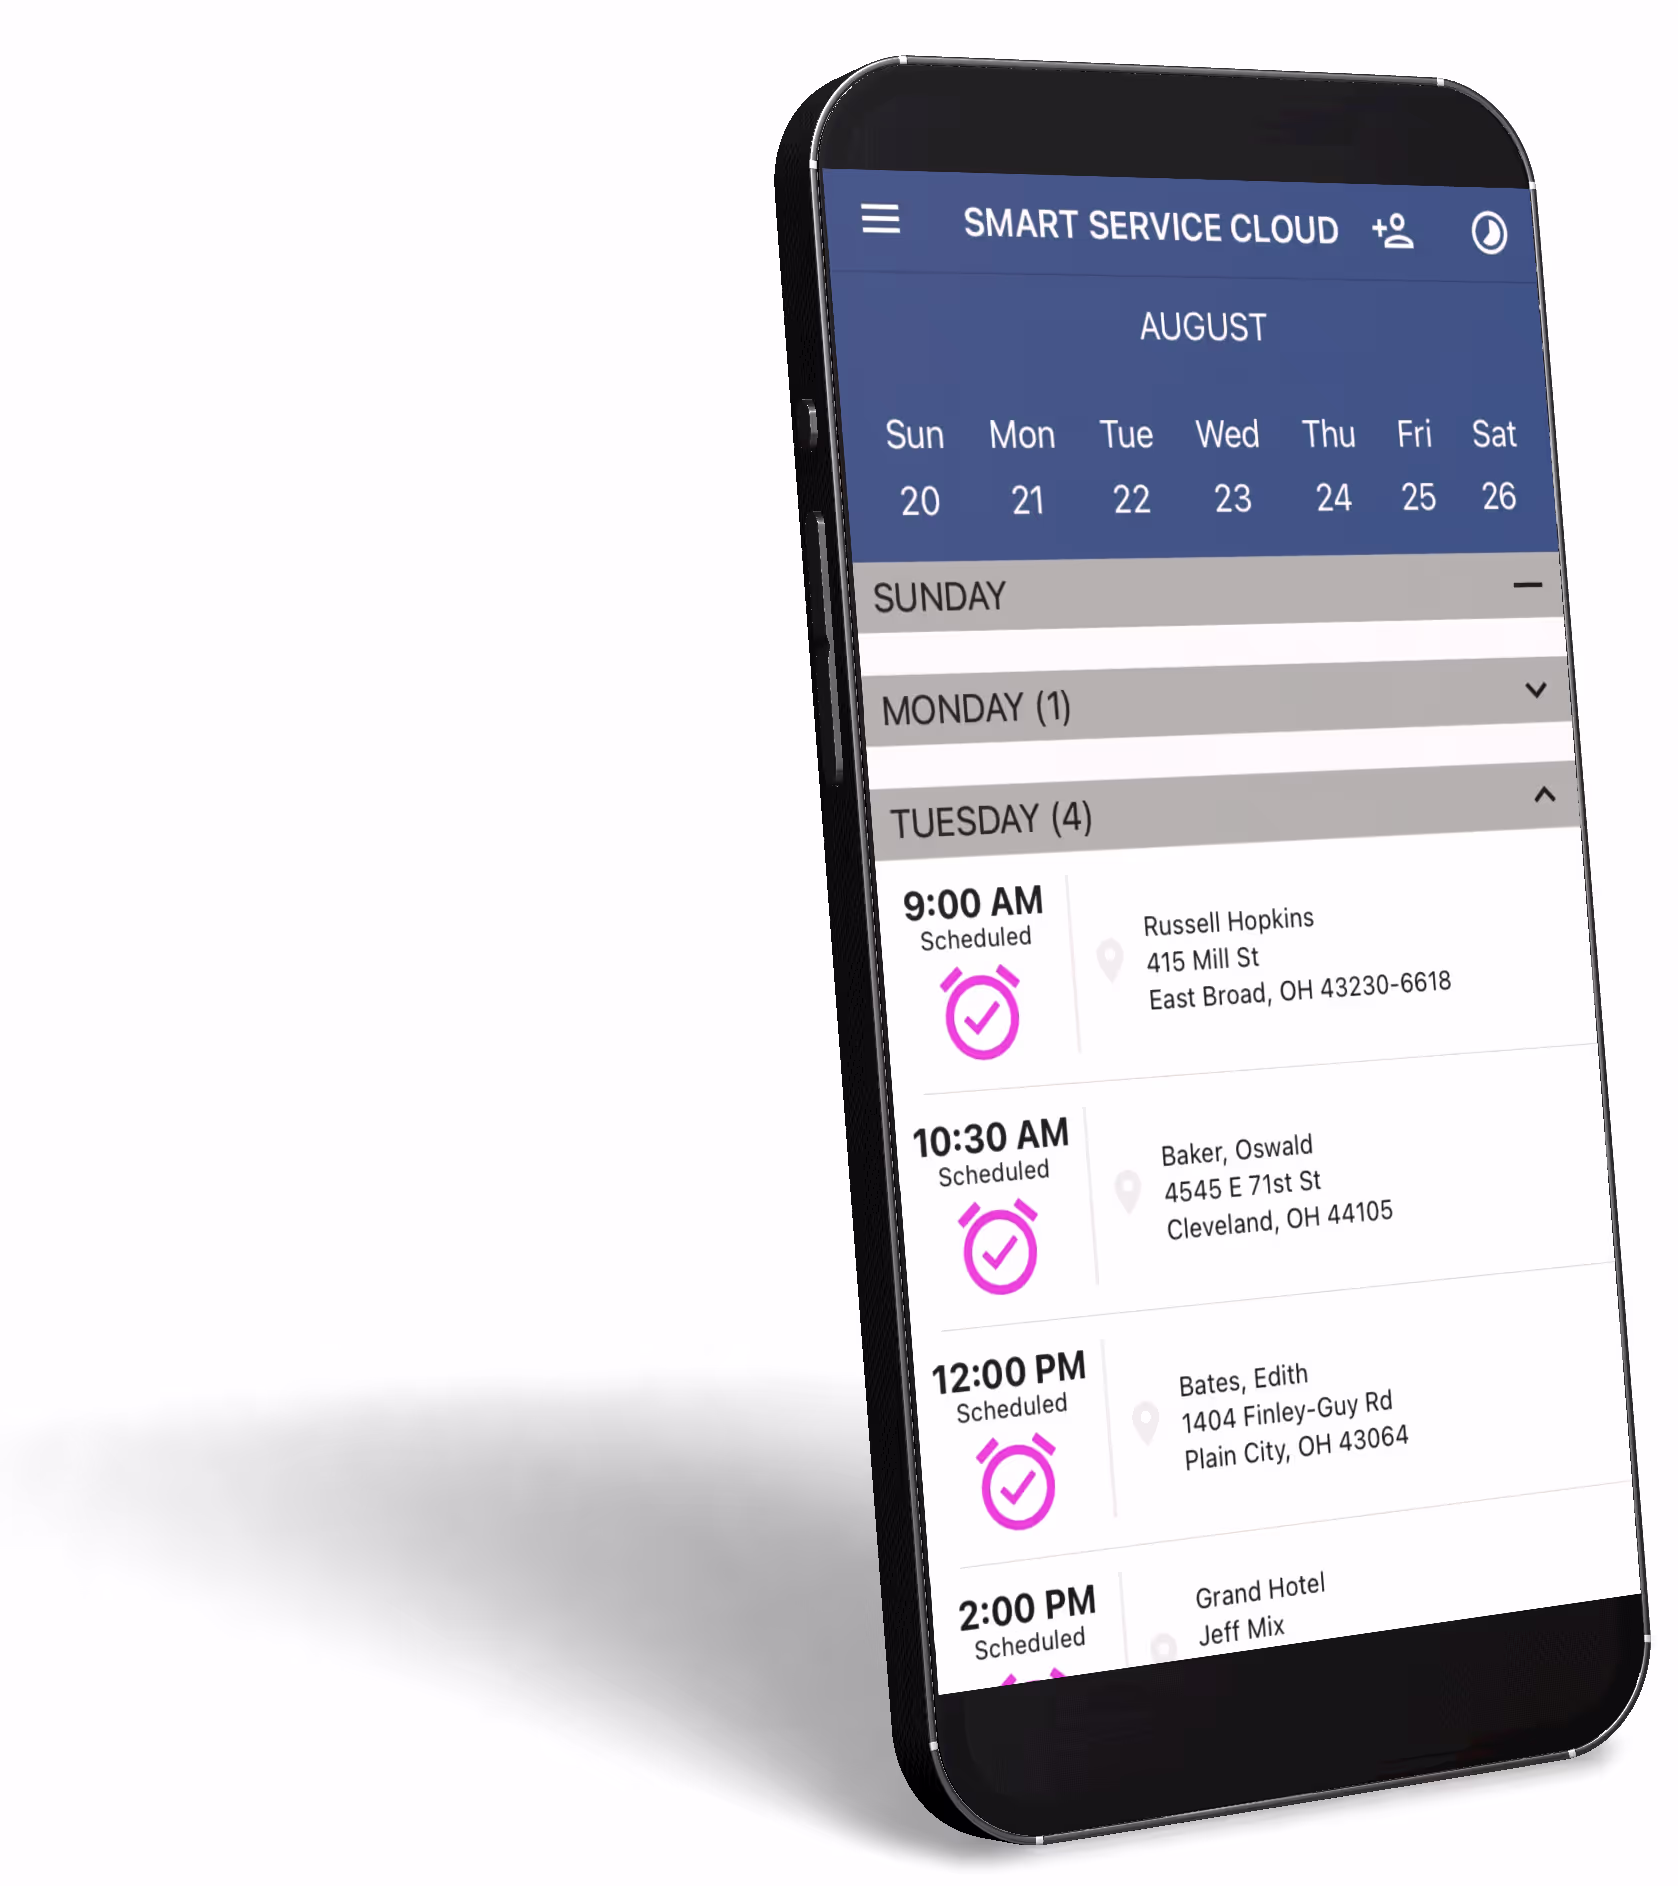
You will see a list of the days of the week. By tapping on a specific day, you will see your jobs that are scheduled for that day.


Tap on the appointment you would like to work on to open it. Once open, you can indicate that you are traveling to the site by tapping on the clock symbol at the top left-hand corner of the appointment.
Tapping that clock will provide a menu with options such as “in-route”, "arrived"," working", and so on. By selecting one of these options, you’re letting the office know where you are and what you’re working on currently.
Remember this section as you’ll come back here when you finish driving and you’re ready to start working so you can mark the appropriate status!
If you would like directions to the customer’s address, tap on their address under the “Customer” section. You can also call and email the customer from here!
Please note that calling or emailing the customer will use the device’s phone number or default email address.
Skip this section if you are not using a Digital Form for a particular service.
When you arrive on-site, make sure to update your timestamp as shown in the previous section. Depending on if you’re providing a quote, completing a work order, or finding out what the customer needs via an appointment, your options may differ slightly from this guide. What you’re seeing below is where you can find your digital form when the service is a work order.
You may also have multiple forms to complete, depending on the service requested and the customer the service is being performed for. The Mobile App will automatically include the relevant documentation for the service and customer in question so fill out whatever you see in the sections discussed below!


Again, depending on your company’s needs and the needs of this customer and service, the options on your screen may differ from what’s being shown above.
For our tutorial, you can see sections containing information on the customer, appointment, work order, and forms we need to complete. You can tap on these sections to expand them and check out the information your office has entered for you.
When you’re ready, tap on your form. In the images above, you can see a customer form to fill out as well as a work order form to complete. Tapping on one of the forms will open the document and you can start filling out the information required.
The forms you see are customized to your company and will not look like the forms above. If you need instructions on how to fill out the form, ask your office team for more information!


The example form shown above will not be the form you see on your copy of the app. If you aren’t sure where the details you need are on your form or which sections are important for you, please contact your office team as every form is requested and customized by your company.
To fill out the form, you can tap on each box on the form to be presented with a popup window where you can enter information.
Depending on the type of box you will receive different options for how to fill it out. For example, checkboxes will pop up with a radio button so you can decide whether the box should be checked or not, but boxes for line items will allow you to search through your products and services.
If you need to take a break from your form, tap the save button at the top right-hand corner. You can open it again later so it’s easy to bounce between forms if needed!


Once you have completed your service and all of the form information has been filled out as needed, tap on the “Finalize” button at the top right-hand corner to complete the service.
The finalize button will not only complete the service, but it will add the forms to the quote of things to be sent back to the office the next time you sync the device.
This is another reason we encourage you to sync the device often. Syncing not only receives your schedule but it also transmits your data back to the office so they can proceed to the next step.
Lastly, make sure you’re done working on this appointment before you tap on the finalize button. While the office can make last minute corrections to the information you have entered, we want to make sure we aren’t causing them extra work on their side.
This section outlines the steps if this particular service doesn't have a Digital Form.

Depending on if you’re providing a quote, completing a work order, or finding out what the customer needs via an appointment, your options may differ slightly from this guide.
In this example you can see sections such as Work Order Items, Equipment, and other sections needed to perform the work.
If the app user can't see the necessary sections, go to the employee's profile, and make sure they have the corresponding permissions. In this case, make sure the toggle switch for "Add/Edit Items" and Add/Edit Equipment" are on. (Seen near the bottom of the screen.)


In this example, you can see in the Work Order Notes that the customer's Air Conditioner isn't running. After diagnosing the issue, you find that the thermostat needs to be replaced.

To add a thermostat, click on Work Order Items.
Click on the plus symbol at the top-right.
Then click in the item field.

Click in the search field to find the thermostat.
Find any other items such as a labor charge.
Click save on the top-right when you are done adding items.

Once you have installed the thermostat, you should add it to the customer's equipment list. To do so, click on the Equipment section.
You will see a list of any other customer-owned equipment that your company has serviced.
Click on the plus symbol at the top-right to add the thermostat.

Enter any applicable information including the status.

You can add GPS coordinates and warranty information.
Add any User Defined information if applicable.
You can also add notes, such as "Thermostat Needed Replaced".

Then you can add pictures to the Equipment record.
When you are done adding Equipment information, hit save at the top-right.

When you have completed this service, click on "Finalize" at the top-right. This will send all of the information back to the office.
It will also change your status to complete. Be sure to sync your device as well.
To check if someone already has a customer profile on file with your business, you can tap on the plus symbol next to the person at the top right-hand corner of the app. That option will open another window where you can choose if you would like to find an existing customer or create a new one. We recommend you ALWAYS try to find an existing customer record for the customer in question before creating a new customer.
After you tap on “Find Existing Customer” you’ll be presented with a few options for how to search for the customer you’re looking for. After you type in some information, tap the “Find Customer” button to start the search!
Results will appear at the bottom of your screen. Any records matching the keywords you entered above will be presented here and tapping on one will give you the option to create a new work order or quote for that customer.


Using the options you learned about in the above section about finding existing customers, tapping on one of the customer records in the search results section will present you with a menu containing that customer’s information and options to create a new quote or work order for that customer.
Remember that if you change any information for the customer you’re updating that information about the customer for the whole company.
You can use the sliders to tell the app if you would like to create a new work order, quote or both for the customer. You can change the scheduling information for the appointment as well!
The type of form you receive on the quote and/or work order will be different depending on the customer, quote, or work order type chosen here. If you aren’t sure which one to use, please reach out to your office.

You can also create new customers directly from the mobile app by tapping on the plus symbol next to the person at the top right-hand corner of the app. This will open up another screen where you have the option to search for an existing customer or create a new one.
We recommend you search for the customer in question first then use the new customer option if you couldn’t find anything, we don’t want to create a duplicate.

When you tap on the “Create New Customer” option, you’ll be presented with the relevant fields for creating a new customer record. Go ahead and fill out as much of this information as you can, the office can always make further corrections later. When you finish with the new customer, tap the “Create” button at the top right-hand corner.
You can also create a new work order or quote from this menu, or go to the search existing customer menu and do the same.
The type of form you receive on the quote and/or work order will be different depending on the customer, quote, or work order type chosen here. If you aren’t sure which one to use, please reach out to your office.